| Pages:
1
..
22
23
24
25
26
..
28 |
charley1957
Hazard to Others
  
Posts: 159
Registered: 18-2-2012
Location: Texas
Member Is Offline
Mood: Roasting
|
|
zts16 I have a daughter who lives in Georgetown and another in Kyle so we're out that way regularly. I feel your humid pain!
You can’t claim you drank all day if you didn’t start early in the morning.
|
|
|
XeonTheMGPony
International Hazard
    
Posts: 1640
Registered: 5-1-2016
Member Is Offline
Mood: No Mood
|
|
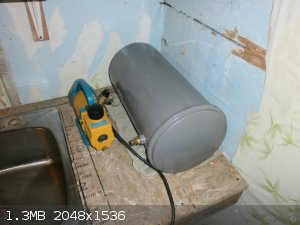
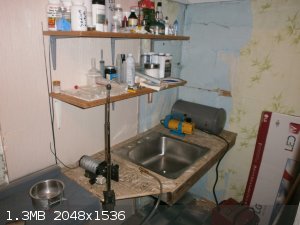
well got tired of my lab looking like some meth cooks dream get away I got to work and started to get the design of it finished, got my vacuum chamber
cleaned and painted, need to finish the support brackets, going to finish the other half of my custom lab frame
then get it all plumbed up so I have water, water return and vacuum line running around the entire room
vac chamber can run either off aspirator or rotary vane vac pump.
|
|
|
XeonTheMGPony
International Hazard
    
Posts: 1640
Registered: 5-1-2016
Member Is Offline
Mood: No Mood
|
|
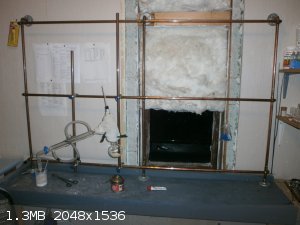
Well finally got the lab frame finished! it is made of all type L copper pipe with galvanized steel flanges, Next is the sink, then get my
water/vac/air lines all set up.
It is 5.3 feet long and 3 feet high. set up on there is a 300mm leibig and a 250mm flask at 24/40 joint size to give an idea of scale.
[Edited on 9-8-2017 by XeonTheMGPony]
|
|
|
JJay
International Hazard
    
Posts: 3440
Registered: 15-10-2015
Member Is Offline
|
|
Copper tubing for a frame is a very interesting idea. I'd like to read more about how that works out.
|
|
|
XeonTheMGPony
International Hazard
    
Posts: 1640
Registered: 5-1-2016
Member Is Offline
Mood: No Mood
|
|
So far it has been solid, it has held up well against most chemicals so far other then the usually discoloring. With Type L it is fairly rigid, got to
be care full to not go over board on tightening your clamps of you get too many burrs makes harder to slide clamps about.
The way I configured it to allow maximum options for building.
I need to get a dozen or better boss heads and some more clamps.
I will add on 2 vertical runs that are better trimmed so each vertical will fit on either set of horizontal run
It holds a fair bit of weight, but I wouldn't climb on it!
|
|
|
JJay
International Hazard
    
Posts: 3440
Registered: 15-10-2015
Member Is Offline
|
|
I see. I have a bag of a dozen boss heads that I've been meaning to use to put together a frame, but electrical conduit is just a little bit larger
diameter than I would like, and I haven't made my way to any of the metal suppliers just yet.
|
|
|
wg48
National Hazard
   
Posts: 821
Registered: 21-11-2015
Member Is Offline
Mood: No Mood
|
|
Its bit like real audiophiles have gold plated connectors.
You know you’re a seriously real chemist when you have a fume hood and a frame LOL
|
|
|
XeonTheMGPony
International Hazard
    
Posts: 1640
Registered: 5-1-2016
Member Is Offline
Mood: No Mood
|
|
Quote: Originally posted by JJay  | | I see. I have a bag of a dozen boss heads that I've been meaning to use to put together a frame, but electrical conduit is just a little bit larger
diameter than I would like, and I haven't made my way to any of the metal suppliers just yet. |
Why I went with copper figured sod it, and solder it. So the entire horizontal run and the vertical rear supports are soldered. Only the vertical
runs that the actual glass wear is attached to is mobile. The top 90 degree fittings where street (One end slips into the fitting directly) and those
where not soldered, So when you want to dismantle the top supports are unscrewed and simply slide off, bottom how ever must be unscrewed from the wood
then unscrewed from the frame.
In hind sight it wouldn't have hurt to put some middle supports in like I originally planed for a bit more rigidity but it is pretty solid as is.
The Boss heads I got from ebay needed very minor filing to get them to fit easily
|
|
|
Geocachmaster
Hazard to Others
  
Posts: 146
Registered: 5-3-2016
Location: Maine, USA
Member Is Offline
Mood: Corroded, just like my spatulas
|
|
I spent yesterday afternoon plus this morning cleaning the lab (it had been a huge mess) and I finally think it's presentable. I would take pictures
but I can't figure out how to change my camera's settings because it currently takes pics that are over 4000p wide (above the image limit for SM).
Instead I made a YouTube video and you can check it out if you want.
Lab Tour
Questions and comments are welcome!
|
|
|
CharlieA
National Hazard
   
Posts: 646
Registered: 11-8-2015
Location: Missouri, USA
Member Is Offline
Mood: No Mood
|
|
Nice lab, Tom, but it is almost too neat and clean to be believable!
-CharlieA (aka Charlie1940)
|
|
|
Sulaiman
International Hazard
    
Posts: 3692
Registered: 8-2-2015
Location: 3rd rock from the sun
Member Is Offline
|
|
Tom
I Just watched a tour of your lab - I'm extremely jealous !
Only one problem ... no excuses for not getting those experiments done now, as planned 
CAUTION : Hobby Chemist, not Professional or even Amateur
|
|
|
Geocachmaster
Hazard to Others
  
Posts: 146
Registered: 5-3-2016
Location: Maine, USA
Member Is Offline
Mood: Corroded, just like my spatulas
|
|
Thanks, both of you!
@ CharlieA I couldn't believe it either 
@ Sulaiman I'm pretty good at coming up with excuses, but I'll get 'em done eventually!
|
|
|
Melgar
Anti-Spam Agent
    
Posts: 2004
Registered: 23-2-2010
Location: Connecticut
Member Is Offline
Mood: Estrified
|
|
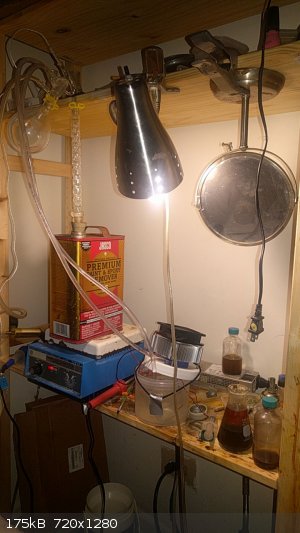
The biggest lab I can have in Manhattan. Bonus points to whoever can deduce the most from from this picture:
[Edited on 8/27/17 by Melgar]
The first step in the process of learning something is admitting that you don't know it already.
I'm givin' the spam shields max power at full warp, but they just dinna have the power! We're gonna have to evacuate to new forum software!
|
|
|
ELRIC
Hazard to Others
  
Posts: 244
Registered: 23-2-2015
Location: Kentucky
Member Is Offline
Mood: No Mood
|
|
Quote: Originally posted by Melgar  | The biggest lab I can have in Manhattan. Bonus points to whoever can deduce the most from from this picture:
[Edited on 8/26/17 by Melgar] |
Are you trying to seperate DCM?
|
|
|
Metacelsus
International Hazard
    
Posts: 2539
Registered: 26-12-2012
Location: Boston, MA
Member Is Offline
Mood: Double, double, toil and trouble
|
|
From the metadata:
You took it with a Nexus 5X Android smartphone at (data removed upon request by Melgar)
You should really be more careful scrubbing such information in the future.
Also, I agree that it looks like you're separating DCM by distillation.
[Edited on 8-26-2017 by Metacelsus]
[Edited on 8-27-2017 by Metacelsus]
|
|
|
Magpie
lab constructor
    
Posts: 5939
Registered: 1-11-2003
Location: USA
Member Is Offline
Mood: Chemistry: the subtle science.
|
|
1. You have a really tiny lab.
2. You have several unfinished experiments yet to workup.
3. You are harvesting DCM by distillation.
4. Your cooling water supply is puzzling - what is the pump?
5. You have a still head temperature indicator.
6. You need to clean up a bit.
The single most important condition for a successful synthesis is good mixing - Nicodem
|
|
|
Melgar
Anti-Spam Agent
    
Posts: 2004
Registered: 23-2-2010
Location: Connecticut
Member Is Offline
Mood: Estrified
|
|
Yeah, obviously distilling DCM directly from the can. That thickening agent is no fun getting out of glass. I'm sure I'm not the only one to do it
this way.
@Metacelsus Well, I suppose you win. Thing is, it's annoying to move images from my phone to my laptop to post them. I used to be able to use
Bluetooth, but that broke or something. I don't really mind. It's not like there's anything illegal going on here, and the building I live in has
really thick steel doors with several sets of locks.
@Magpie Yeah, the thermocouple I made to use for measuring temperature isn't plugged in, just because there isn't much point, but it does work. I was
wondering if anyone would notice that I was using a thermoelectric cooler, with a CPU fan on one side and a heat exchanger on the other. It's 100W,
and isn't really very powerful. It's more like a really good heatsink than it is a refrigeration unit. It definitely helps keep ice from melting as
fast though. The pump is a small white submersible one that's kind of hard to see.
The first step in the process of learning something is admitting that you don't know it already.
I'm givin' the spam shields max power at full warp, but they just dinna have the power! We're gonna have to evacuate to new forum software!
|
|
|
arkoma
Redneck Overlord
      
Posts: 1761
Registered: 3-2-2014
Location: On a Big Blue Marble hurtling through space
Member Is Offline
Mood: украї́нська
|
|
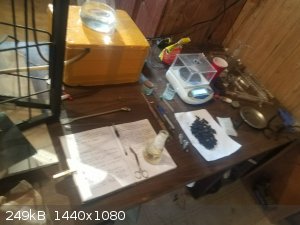
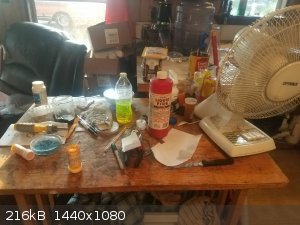
Finally feeling well enough to set up some space, and as I am a bachelor I can get away with using most of kitchen
Love my new electronic balance. Freshly made black powder on the sheet of paper. "ball milled" by shaking in plastic bottle with 00 buckshot while
watching the tube LOL. Crude 1,4 dioxane in flask
Ingredients for 1,4 dioxane. Was a cool synthesis
HOWEVER, I switched out the receiver just before this crap started acting like a science fiction monster
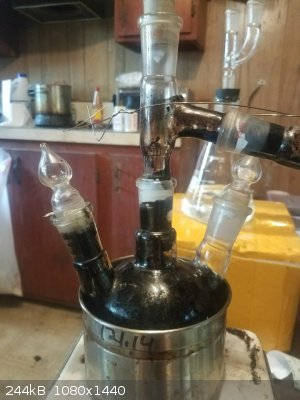
As you can see made quite a mess, and its evolution was SUDDEN. Cleaned up nicely with 10% NaOH solution
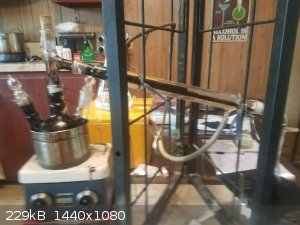
[Edited on 9-6-2017 by arkoma]
"We believe the knowledge and cultural heritage of mankind should be accessible to all people around the world, regardless of their wealth, social
status, nationality, citizenship, etc" z-lib
|
|
|
j_sum1
Administrator
       
Posts: 6320
Registered: 4-10-2014
Location: At home
Member Is Offline
Mood: Most of the ducks are in a row
|
|
Awesome Arky.
Glad you are back up on deck. I guess this means the leg is well on the mend.
|
|
|
SWIM
National Hazard
   
Posts: 970
Registered: 3-9-2017
Member Is Offline
|
|
Quote: Originally posted by Melgar  | | Yeah, obviously distilling DCM directly from the can. That thickening agent is no fun getting out of glass. I'm sure I'm not the only one to do it
this way. |
I'm surprised the short-path head condenser is up to condensing something so low boiling. And you're using an un-cooled collection flask.
I always use a long condenser and cool the collection flask in ice water to keep the stuff in the flask, but maybe I'm overcautious. Is it cold where
you work?
Lately you could almost boil DCM by leaving it out on the Kitchen counter around my neck of the woods.
|
|
|
j_sum1
Administrator
       
Posts: 6320
Registered: 4-10-2014
Location: At home
Member Is Offline
Mood: Most of the ducks are in a row
|
|
Quote: Originally posted by j_sum1  |
And here is the lab space. A lot of work to do. The site is a breezeway under the house. Etc... (snip)
|
Update.
I have finally had a bit of a chance to work on lab construction. Lots more to do but it is starting to get there.
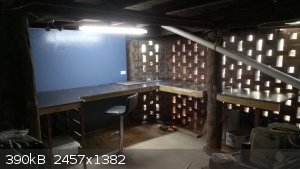
This shot was taken from the same angle as my previous post upthread. Stumps were dug out. Concrete laid. Walls put up. Painted. Electrical work done. And now the bench constructed.
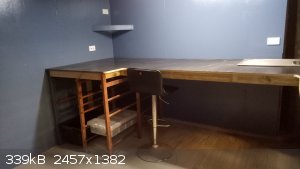 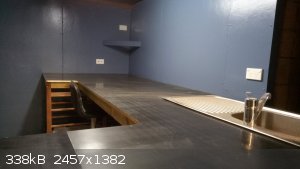
There will be plenty of under-bench storage. On the left you can see space for 14 sliding plastic bins of two different sizes. That will be for
glassware. Elsewhere will be open shelves for other hardware not in use. I have not worked out the configuration yet. I will keep some bulk
chemicals over near the breeze-block wall: the ones that benefit from a bit of ventilation.
The sink has a bit of an unorthodox orientation but I think it will work. I am going to end up with a little corner behind the fume cupboard where I
can put the vacuum pump and recirculation pump. Actually I can see myself most of the time just putting a plug in the sink and throwing the pump
directly in there. Water will come from a rainwater tank directly outside.
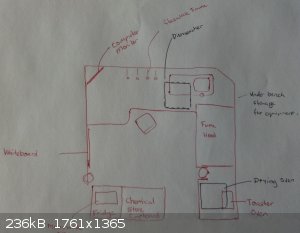
Working round the room from the left:
Large lockable chemicals cupboard
Fridge-freezer with microwave oven on top
Whiteboard
Wall-mounted computer monitor. USB and HDMI jackpoints connect to the office on the other side of the wall so I won't need to put the laptop in
the lab.
Main work area. The bench varies between 900 and 1200mm deep and it is a stretch to reach to the back. I likes my bench-space. I have yet to
sort out how I will do the glassware frame -- probably repurposed stainless steel towel rails.
Dishwasher under the bench
Fume cupboard -- 1200mm wide by 700 deep and about 700 high. Ducting will chimney above the roof to a height of 8m which should be acceptable
to the neighbours.
Mounted next to the fume cupboard at the entry to the lab will be some fire safety equipment on one side and a place for lab-coat, glasses and
gloves on the other.
Drying oven below bench and a toaster oven above.
Not sure how long the rest will take but I hope to get some spare weekends to knock it off.
|
|
|
Melgar
Anti-Spam Agent
    
Posts: 2004
Registered: 23-2-2010
Location: Connecticut
Member Is Offline
Mood: Estrified
|
|
Quote: Originally posted by SWIM  | I'm surprised the short-path head condenser is up to condensing something so low boiling. And you're using an un-cooled collection flask.
I always use a long condenser and cool the collection flask in ice water to keep the stuff in the flask, but maybe I'm overcautious. Is it cold where
you work?
Lately you could almost boil DCM by leaving it out on the Kitchen counter around my neck of the woods. |
There's actually a window AC unit right out of the picture, that I had aimed at the upper part of the apparatus, but it was night out anyway, and not
very hot. I only distilled about 200 mL anyway.
Now I have quick disconnects on my tubing so that I can swap out distillation heads a lot easier. I actually have three different heads: a regular
one that can be broken down into components, a short-path, and a regular-sized one-piece head with a built in Claisen adapter. I got that one for
like $38 on eBay; usually they're listed for somewhere in the triple digits.
The first step in the process of learning something is admitting that you don't know it already.
I'm givin' the spam shields max power at full warp, but they just dinna have the power! We're gonna have to evacuate to new forum software!
|
|
|
MrHomeScientist
International Hazard
    
Posts: 1806
Registered: 24-10-2010
Location: Flerovium
Member Is Offline
Mood: No Mood
|
|
It's been a very long time in the works, but my total lab overhaul is finally complete. For the full tour, see my video on my channel: https://www.youtube.com/watch?v=QfoUfO0QxW4
I took a quick spin around the room to post some photos here if you don't want to sit through the full 10 minutes:
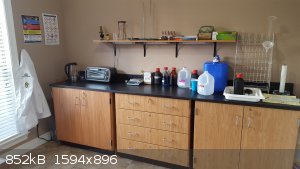
Replaced all carpet with tile and got all new furniture: official lab cabinets with black epoxy tops for maximum heat and chemical resistance. Also
got a few lab appliances you see on the left - a toaster oven and water kettle. The kettle is AMAZING; it boils water super fast, and I got it on
Amazon for about $25.
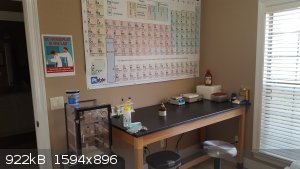
Large tabletop work space, desiccator cabinet, and chemical fridge. Not explosion proof, but I'm not keeping much in there anyway.
I want to point out the awesome periodic table poster - I got it from an Etsy store and the seller really worked with me to get the right size and
material for me. Each square looks like a solid color from far away, but up close there's a ton of useful information on every element. The site
listed on the poster is www.ptable.com. Highly recommended!
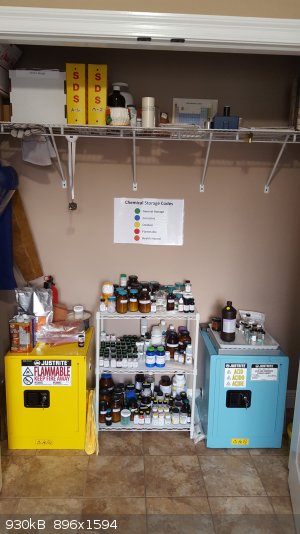
Real hazard storage cabinets for flammables and acids. All chemicals separated by appropriate storage code. Also note the giant SDS binders up top -
it's very important to know the hazards of everything you work with. Printed SDS's are expensive, but could be very helpful if you need to provide
info to first responders quickly and easily.
There's also another giant cabinet in another room, because it was way too big to fit through the hallway to the lab (see the video). Whoops! I keep
extra stuff in there that I don't use often. It actually worked out nicely because it forced me to get a 3rd low cabinet, and putting those together
makes another large work surface which is really nice.
Total cost: over $8,000 
Worth it though! I'm so happy with how it turned out.
The only thing missing is a fume hood. I can't for the life of me figure out where to put it, mainly because I can't for the life of me figure out
where the fumes will go. I really don't want to put a hole through the roof. Working on the back porch will suffice for now. Exciting times ahead!
|
|
|
Magpie
lab constructor
    
Posts: 5939
Registered: 1-11-2003
Location: USA
Member Is Offline
Mood: Chemistry: the subtle science.
|
|
Beautiful lab. I like the epoxy bench top.
I wouldn’t worry about cutting a hole in your roof at all. I did this for the exhaust for my hot water heater. Just cut to size for your duct,
taking out the plywood and asphalt shingles ( I presume you have this kind of roof). Seal an aluminum flashing to the plywood and replace the
shingles. It’s a piece of cake!
The single most important condition for a successful synthesis is good mixing - Nicodem
|
|
|
j_sum1
Administrator
       
Posts: 6320
Registered: 4-10-2014
Location: At home
Member Is Offline
Mood: Most of the ducks are in a row
|
|
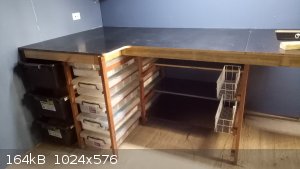
This is a teaser /progress report.
I spent today doing construction in my lab. Hopefully fully complete this side of Christmas (maybe without fume cupboard). I will do a proper tour
then.
Today's task was to complete the under-bench storage -- at least for this part of the bench. The top is 1200/900 mm deep. On the left are six black
bins that slide out and 10 white bins with lids that will mostly contain ground glassware. Next to that are three open shelves for highuse equipment:
power supply, pump, mantle, hotplate, boxes of indicators and filter papers and thermometers -- that kind of thing. The baskets slide out on drawer
sliders. Next to that will be a dishwasher. What you see in this photo is about 40% of the total bench space.
|
|
|
| Pages:
1
..
22
23
24
25
26
..
28 |