Ubya
International Hazard

Posts: 1246
Registered: 23-11-2017
Location: Rome-Italy
Member Is Offline
Mood: I'm a maddo scientisto!!!
|
|
Building a DIY Pirani Gauge from a lightbulb
DISCLAIMER
If you copy exactly what I did, you'll be able to read a numeric value that without calibration is nearly useless. I'm ok with nearly useless because
i'm only interested in seeing this value going up or down and by how much, the exact numbers are not important to me. If you want to correlate this
"random" values to an actual pressure, you'll need to calibrate it with an actual working gauge (that I don't have at the moment).
Objectives of this project
I've been experimenting with plasma discharges for a few years already, and until now I've always totally eyeballed the vacuum level in my systems by
just looking at the color and opacity of plasma. A method that worked fine to distinguish if my vacuum chamber or my pump were total garbage, but
totally unusable to my untrained eyes to distinguish very minor leaks.
After upgrading to a 2 stages rotary vane vacuum pump, and an all metal KF apparatus, I even got toally rid of any plasma, and was left with
fluorescence cause by high energy electrons, but I still needed a way to know if the pressure was going up, down or staying still.
I needed a device capable of distinguishing changes in pressure in the range of 10-1Pa, the lowest pressure achievable by my rotary vane
vacuum pump, with junk laying around.
This project doesn't require any particular skills or tools, and all the steps can be done in about 1 hour.
The Pirani Vacuum Gauge
A pirani gauge is essentially a heated filament exposed to the vacuum you want to measure. By feeding a small current to the filament, it will heat
up. the amount of heating depends on the supplied current and the pressure of the environment. At higher pressures there are more molecules to carry
away the heat from the filament due to convection. At lower pressures there aren't many molecules, and the temperature of the filament increases.
When the filament heats up, its resistance also increases, so we can correlate the increase in resistance with a lowering of pressure.
This resistance change can be very small, not easy to detect with a simple multimeter, so we use a circuit called a Wheatstone Bridge.
When R1/R3 is equal to R2/Rx, Vout is 0V.
Any changes in Rx will cause a potential difference to be detected.
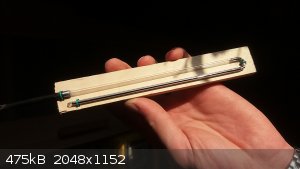
My DIY Pirani Vacuum Gauge
Some people wound their own filament from very thin tungsten wire, I thought of doing that too, but I already had a tungsten filament encased in a
vacuum tight vessel, just a regular incandescent lightbulb (even though they are pretty uncommon now).
I just had to make a hole in a lightbulb without cracking the glass, easier said than done!
I tried different kinds of lightbulbs, but the best ones are these little miniature lighbulbs that can be had for super cheap.
I bought the 4mm 24V model, and I'll say later why
After gently sanding the tip with some not so fine sandpaper, I epoxied it in a hole I drilled in a KF25 end cap.
I'm using KF parts because my vacuum system is based on those, but if you are using glass or random copper pipes and jam jars, you can glue this tiny
bulb wherever you like, just make sure it is a vacuum tight seal.
Some epoxies don't behave optimally under vacuum. JB-weld is apparently quite good for vacuum work, but I don't have that in my country, so I had to
try a few out before I found this that degasses the least.
Now the electrical part of the project.
This are the components I used for the Wheatstone Bridge
- R1 100 ohm 1W
- R3 100 ohm 1W
- R2 220 ohm 1W + 100 ohm potentiometer
- Rx 4mm 24V incandescent lightbulb
R1 and R3 can probably be normal 1/4W resistors, I went with 1W versions only to minimize the resistance change caused by joule
heating.
I'm supplying the wheatstone bridge with 5V, so one may ask, why did I buy a 24V rated lightbulb if I'm feeding it with 5V though a resistor of at
least 220 ohms.
Tungsten won't melt at 2000°C, but it will happily burn in a blink of an eye if exposed to oxygen.
A bigger temperature delta will give us a bigger resistance delta, and a bigger range of voltages between atmospheric pressure and "vacuum", but it
will also shorten the life of our gauge, or instantly kill it as soon as we apply power to it.
The 220 Ohm resistor was picked to make the filament barely glow when under high vacuum, and be only a couple hundred degrees when at atmospheric
pressure.
The 100 ohm potentiometer is there for us to set the 0V point at the vacuum lever we desire.
With this configuration the cold filament has a resistance of 60-70 ohm (varies from bulb to bulb) and reaches a max of 320 ohm when heated in a
vacuum.
The voltage output goes from -1.2V to 0V.
If in your setup you start getting positive values, it is ok, the pressure is still going down, as i said, these values are arbitrary, their direction
is more important than their absolute value.
Still, you can adjust the potentiometer to make your lowest pressure 0V.
If one is bothered by the negative voltage, swapping the leads of the multimeter solves the "issue" XD
Here is a quick video of the gauge in action
Attachment: DIY Pirani Gauge pumping down.mp4 (4.2MB)
This file has been downloaded 41 times
Pirani gauges are intrinsically not very precise, and my rendition of one hasn't for sure the best performance, but it allows me to distinguish
changes in pressures of a few Pascals or less
[Edited on 28-6-2024 by Ubya]
---------------------------------------------------------------------
feel free to correct my grammar, or any mistakes i make
---------------------------------------------------------------------
|
|
|
Rainwater
National Hazard
Posts: 846
Registered: 22-12-2021
Member Is Offline
Mood: indisposition to activity
|
|
Quote: Originally posted by Ubya  |
When the filament heats up, its resistance also lowers, so we can correlate the increase in resistance with a lowering of pressure
|
Raises
But spot on design.
The light bulb filament is the only thing stopping you from calculating the exact pressure.
I would suggest nicrome wire. It is easier to get and more chemically resistant across your desired temperature range. More importantly, you can
measure its length accurately. You can not do that with a light bulb filament.(its a spring, made from a spring)
Measuring the length, resistance, and weight you can characterize the heater. Them measure the thermal dissipation and compare it to a reference
chart.
stolen from google
As you can see the area useful for radiant thermal emissions is.... more than difficult... to calculate. A stright peace of wire would be much more
manageable
"You can't do that" - challenge accepted
|
|
|
Ubya
International Hazard
Posts: 1246
Registered: 23-11-2017
Location: Rome-Italy
Member Is Offline
Mood: I'm a maddo scientisto!!!
|
|
Thanks Reinwater for spotting my mistke. Of course I meant increases but I managed to screw up while typing (I had to retype the entire post becase
trying to load the video managed to reset the page.....)
Yeah for sure, a more involved design allows a much better control on the various variables, i went with a lightbulb because it is something that
anyone can buy and expect similar performances.
I also tried to make metal to glass vacuum tight seals in the past, and it wasn't as easy as I expected.
There are also ways to improve my design, but I went with the simple stupid one, because it is stupid simple to make.
I will try other designs now 
---------------------------------------------------------------------
feel free to correct my grammar, or any mistakes i make
---------------------------------------------------------------------
|
|
|
Jenks
Hazard to Others
Posts: 143
Registered: 1-12-2019
Member Is Offline
|
|
This is a nice experiment and I will remember it. I wonder if silicone might work better than epoxy to bond the light bulb to a glass or metal tube.
I've been obsessed lately with the potential of silicone cement.
|
|
|
Ubya
International Hazard
Posts: 1246
Registered: 23-11-2017
Location: Rome-Italy
Member Is Offline
Mood: I'm a maddo scientisto!!!
|
|
| Quote: Originally posted by Jenks | | This is a nice experiment and I will remember it. I wonder if silicone might work better than epoxy to bond the light bulb to a glass or metal tube.
I've been obsessed lately with the potential of silicone cement. |
I haven't tried any silicone based adhesives in this case, but I've tried using silicone caulking in past vacuum experiments.
It is veeery permeable. I thought I could DIY my own gaskets with silicone, but it was like having a leak
---------------------------------------------------------------------
feel free to correct my grammar, or any mistakes i make
---------------------------------------------------------------------
|
|
|
Rainwater
National Hazard
Posts: 846
Registered: 22-12-2021
Member Is Offline
Mood: indisposition to activity
|
|
At that pressure, stay away from epoxy, silicone, rubber, steel, zinc, lead, tin, most copper and a long list of other stuff .
Temperature permitting, carving wax also called Faraday Wax will be the cheapest to acquire and easiest to use.
If your wax feels oily, its no good. You want it rock hard at 22c.
"You can't do that" - challenge accepted
|
|
|
Twospoons
International Hazard
Posts: 1301
Registered: 26-7-2004
Location: Middle Earth
Member Is Offline
Mood: A trace of hope...
|
|
Actually nichrome is a terrible choice for a temperature sensing element, as it has a Tcr an order of magnitude less than tungsten (0.0004 vs
tungsten's 0.0045). You'd do better with nickel (0.006) or iron (0.005). Or maybe platinum (0.00392) just because it will be more inert, and is
available in very thin gauges.
Another way to drive the Pirani gauge is to create a feed back circuit that keeps the gauge wire resistance (and temperature) constant by varying the
bridge drive voltage. This keeps the radiated losses constant so only the conduction loss affect the bridge. Bridge voltage is then related to
pressure (probably not linear though - these things seldom are). Easy to do with a single opamp.
The only question I have with DIY Pirani gauges is how to calibrate it?
[Edited on 29-6-2024 by Twospoons]
Helicopter: "helico" -> spiral, "pter" -> with wings
|
|
|
Ubya
International Hazard
Posts: 1246
Registered: 23-11-2017
Location: Rome-Italy
Member Is Offline
Mood: I'm a maddo scientisto!!!
|
|
Exact reason why I added a disclaimer at the top of the post 
---------------------------------------------------------------------
feel free to correct my grammar, or any mistakes i make
---------------------------------------------------------------------
|
|
|
bnull
Hazard to Others
Posts: 269
Registered: 15-1-2024
Location: Between the Atlantic and the Pacific Ocean
Member Is Offline
Mood: Sleepy (again)
|
|
Glue a small piece of carborundum with epoxy putty to the head of a 2 mm Ø steel nail and attach the nail to a portable screwdriver. The carborundum
can come from a sharpening stone or from a thick metal cutting disc.
Edit: By the way, nice idea.
[Edited on 29-6-2024 by bnull]
Quod scripsi, scripsi.
B. N. Ull
P.S.: Did you know that we have a Library?
|
|
|
Ubya
International Hazard
Posts: 1246
Registered: 23-11-2017
Location: Rome-Italy
Member Is Offline
Mood: I'm a maddo scientisto!!!
|
|
| Quote: Originally posted by bnull |
Glue a small piece of carborundum with epoxy putty to the head of a 2 mm Ø steel nail and attach the nail to a portable screwdriver. The carborundum
can come from a sharpening stone or from a thick metal cutting disc.
Edit: By the way, nice idea.
[Edited on 29-6-2024 by bnull] |
I have glass drill bits and diamond coated dremel bits (different shapes).
it mostly depends on the type of bulb how easy is to crack it.
someone also suggested me to try the drilling/sanding under water, but I fear it would damage the delicate filament
probably the best way would be to use the flat side of a diamon coated disc
---------------------------------------------------------------------
feel free to correct my grammar, or any mistakes i make
---------------------------------------------------------------------
|
|
|
bnull
Hazard to Others
Posts: 269
Registered: 15-1-2024
Location: Between the Atlantic and the Pacific Ocean
Member Is Offline
Mood: Sleepy (again)
|
|
What about waterproof sandpaper for metal with a little bit of vaseline or mineral oil as lubricant? I never had issues with a 150 grain sandpaper at
low speed (<1000 RPM), and the surface gets rough enough to permit a good adhesion.
Quod scripsi, scripsi.
B. N. Ull
P.S.: Did you know that we have a Library?
|
|
|
Ubya
International Hazard
Posts: 1246
Registered: 23-11-2017
Location: Rome-Italy
Member Is Offline
Mood: I'm a maddo scientisto!!!
|
|
| Quote: Originally posted by bnull | | What about waterproof sandpaper for metal with a little bit of vaseline or mineral oil as lubricant? I never had issues with a 150 grain sandpaper at
low speed (<1000 RPM), and the surface gets rough enough to permit a good adhesion. |
I ordered more lightbulbs to make other things. I might use the excuse to try different cutting methods.
I didn't want to use oil in this case because it would have been impossible to remove fully without damaging the filament (maybe soaking for multiple
times in clean solvent) or spoiling the epoxy seal or vacuum
---------------------------------------------------------------------
feel free to correct my grammar, or any mistakes i make
---------------------------------------------------------------------
|
|
|
bnull
Hazard to Others
Posts: 269
Registered: 15-1-2024
Location: Between the Atlantic and the Pacific Ocean
Member Is Offline
Mood: Sleepy (again)
|
|
On the other hand, you can use the sandpaper dry. Just blow it and the bulb now and then to cool and remove glass dust. It takes a little longer to
drill but, again, I never had issues.
Quod scripsi, scripsi.
B. N. Ull
P.S.: Did you know that we have a Library?
|
|
|
wg48temp9
National Hazard
Posts: 768
Registered: 30-12-2018
Location: not so United Kingdom
Member Is Offline
|
|
Ubya: Interesting experiment.
To reduce the effects of ambient temperature, you should have used an identical intact bulb for R2 and put the zero adjust pot in the other leg. A
good stabilised supply for the bridge will also help. Both bulbs should be mounted on the blanking plate.
Much better would be to use a ratio metric A/D convertor that measures the ratio of the sensor bulb resistance to the R2 bulb resistance.
See: https://www.allaboutcircuits.com/technical-articles/ratiomet... Sorry, its a terrible page interleaved with ads.
Perhaps you will progress to build a GC unit using a pair of bulb filaments for the thermal conductivity detector. There are some DIY Gas
chromatograph videos on YouTube using bulbs for the detector. Also the posting below titled "How to pack your own GC columns" for some links to such
videos
I am wg48 but not on my usual pc hence the temp handle.
Thank goodness for Fleming and the fungi.
Old codger' lives matters, wear a mask and help save them.
Be aware of demagoguery, keep your frontal lobes fully engaged.
I don't know who invented mRNA vaccines but they should get a fancy medal and I hope they made a shed load of money from it.
|
|
|
wg48temp9
National Hazard
Posts: 768
Registered: 30-12-2018
Location: not so United Kingdom
Member Is Offline
|
|
Following on from my post above:
A HX711 Digital Weight Pressure Sensor Module Dual-channel 24-bit A/D is available on eBay for only £2.79. It can be configured as a half bridge and
has a stabilized bridge supply. It would have to be connected to an Arduino then to a pc or a display if you wanted it self-contained. If you're
"into" Arduinos it would be simple.
WOW 24bit A/D for under £3
I am wg48 but not on my usual pc hence the temp handle.
Thank goodness for Fleming and the fungi.
Old codger' lives matters, wear a mask and help save them.
Be aware of demagoguery, keep your frontal lobes fully engaged.
I don't know who invented mRNA vaccines but they should get a fancy medal and I hope they made a shed load of money from it.
|
|
|
Twospoons
International Hazard
Posts: 1301
Registered: 26-7-2004
Location: Middle Earth
Member Is Offline
Mood: A trace of hope...
|
|
Yeah, but only 80 samples per second so the price is not surprising. Fine for a weigh scale or Pirani gauge though.
Heres a rather neat drive circuit for constant temperature:
https://www.researchgate.net/figure/Constant-bias-Wheatstone-bridge-circuit-for-the-Pirani-gauge-operation-14_fig5_367345798
The two transistors should ideally be a matched pair, but thats no obstacle.
Helicopter: "helico" -> spiral, "pter" -> with wings
|
|
|
Ubya
International Hazard
Posts: 1246
Registered: 23-11-2017
Location: Rome-Italy
Member Is Offline
Mood: I'm a maddo scientisto!!!
|
|
| Quote: Originally posted by wg48temp9 |
Perhaps you will progress to build a GC unit using a pair of bulb filaments for the thermal conductivity detector. There are some DIY Gas
chromatograph videos on YouTube using bulbs for the detector. Also the posting below titled "How to pack your own GC columns" for some links to such
videos
|
https://www.sciencemadness.org/whisper/viewthread.php?tid=16...
Yup it's my post xD
one thing led to the other quite quickly.
Thanks @wg48temp9 and @Twospoons for the links, I'll try both (and maybe more) drivers to pick the best in the end.
(I already have a HX711 board hehehhe)
---------------------------------------------------------------------
feel free to correct my grammar, or any mistakes i make
---------------------------------------------------------------------
|
|
|
Twospoons
International Hazard
Posts: 1301
Registered: 26-7-2004
Location: Middle Earth
Member Is Offline
Mood: A trace of hope...
|
|
Also be aware that the "24-bits" is misleading. With the input range set up to be 20mV full scale, the LSB is ~1nV. But the input referred noise for
10Hz sampling and 128 gain is 50nV, which basically means the 6 LSB are noise, so what you really have is an 18bit converter. For the non-EE members
this parameter is usually referred to as "Effective Number of Bits" or ENOB. Look for this parameter in the datasheet if you want to know the useful
resolution of your ADC. Oversampling can win back a bit or two, but its a law of diminishing returns and comes at the cost of bandwidth.
Helicopter: "helico" -> spiral, "pter" -> with wings
|
|
|
wg48temp9
National Hazard
Posts: 768
Registered: 30-12-2018
Location: not so United Kingdom
Member Is Offline
|
|
I found it difficult to program an arduino, but I would still like to get a HX711 working with a display. So I thought perhaps there is an all-in-one
module available. Yes there are several. AliExpres has a cheap one, two modules with a 4 digit display for about £5 including delivery
See https://www.aliexpress.com/item/4000483669372.html?spm=a2g0o...
[Edited on 7/9/2024 by wg48temp9]
I am wg48 but not on my usual pc hence the temp handle.
Thank goodness for Fleming and the fungi.
Old codger' lives matters, wear a mask and help save them.
Be aware of demagoguery, keep your frontal lobes fully engaged.
I don't know who invented mRNA vaccines but they should get a fancy medal and I hope they made a shed load of money from it.
|
|
|
wg48temp9
National Hazard
Posts: 768
Registered: 30-12-2018
Location: not so United Kingdom
Member Is Offline
|
|
I was thinking about how a DIY Pirani Gauge could be calibrated:
Apparently, such gauges are linear when the mean free path of the gas is larger than the distance between the filament and the glass walls. That gap
is greater than 1mm for miniature bulb.. The mean free path of air at 1Torr (1mm mercury) and room temperature.
I think it is possible to make a mercury manometer and measure the difference in height of the mercury to 1mm =/- 0.5mm. Perhaps using vacuum pump
oil it would be about 13mm. So that fixes the top end of the gauges linear range. at 1Torr.
Apparently, the bottom end of the linear range levels off due to thermal conduction though the leads of the filament and from its thermal radiation.
Perhaps those can be estimated from calculation.
I am wg48 but not on my usual pc hence the temp handle.
Thank goodness for Fleming and the fungi.
Old codger' lives matters, wear a mask and help save them.
Be aware of demagoguery, keep your frontal lobes fully engaged.
I don't know who invented mRNA vaccines but they should get a fancy medal and I hope they made a shed load of money from it.
|
|
|
Ubya
International Hazard
Posts: 1246
Registered: 23-11-2017
Location: Rome-Italy
Member Is Offline
Mood: I'm a maddo scientisto!!!
|
|
https://youtu.be/Md1ay-Gkozs
I found this @wg48temp9
it is probably the easiest thing to get some probably close to reality values, instead of purely indicative values
---------------------------------------------------------------------
feel free to correct my grammar, or any mistakes i make
---------------------------------------------------------------------
|
|
|
Twospoons
International Hazard
Posts: 1301
Registered: 26-7-2004
Location: Middle Earth
Member Is Offline
Mood: A trace of hope...
|
|
For intermediate pressure calibration a low friction piston with a set of weights can be used to create a known vacuum. If you know the area of your
piston and the weight hanging off it you can calculate the vacuum pressure inside the piston (you would also take into account the local atmospheric
pressure).
I'm fortunate to have been recently given some old sphygmomanometers, from which i've extracted quite a bit of mercury. So for me a mercury manometer
is now an option.
Helicopter: "helico" -> spiral, "pter" -> with wings
|
|
|
Sulaiman
International Hazard
Posts: 3620
Registered: 8-2-2015
Location: 3rd rock from the sun
Member Is Offline
|
|
as you have mercury, you could maybe consider a McLeod gauge as a calibration reference.
(I've not found a cheap one yet)
For a low pressure u-tube manometer I'd try (vacuum pump) oil, 15x less dense,
(ie 1mm Hg = 15mm oil, or 1mmOil = 8.9 Pa approx.)
and safer for you, your pump, and the environment.
PS I am preparing to make a mercury u-tube manometer, (have been for years) 
read quite a bit, learned a little.
As a 'primary' reference there are loads of details.
I'm aiming for +/- 1000 mmHg range, <1 mmHg absolute error.
When I buy a new 'phone/have a working camera,
I intend to start a thread here and make a YT video.
Also, if for only low pressures then only a short u-tube is required,
eg a 300mm long glass tube could have one end sealed, then bend the glass into a u-tube shape,
and have maybe a 0 to100mm range (Hg or oil)
[Edited on 11-7-2024 by Sulaiman]
CAUTION : Hobby Chemist, not Professional or even Amateur
|
|
|
Ubya
International Hazard
Posts: 1246
Registered: 23-11-2017
Location: Rome-Italy
Member Is Offline
Mood: I'm a maddo scientisto!!!
|
|
When I first started making vacuum experiments I tried building a low pressure mercury U gauge, but I couldn't get all the air out of the sealed end,
so it was effectively useless
the contaminated tube got converted into a mercury "discharge" tube

---------------------------------------------------------------------
feel free to correct my grammar, or any mistakes i make
---------------------------------------------------------------------
|
|
|
wg48temp9
National Hazard
Posts: 768
Registered: 30-12-2018
Location: not so United Kingdom
Member Is Offline
|
|
If you mean measured for reality and indicated means calculated from theory then no matter how confident the theory is, it is better (meaning more
confidence) to check the theory with measurements and the more of them the better. That is true in physics, chemistry and most things.
The problem with the U tube manometer it covers only a limited vacuum range, for oil about 0.5Torr to 10torr for 100mm of oil. Fortunately, its
lowest vacuum (pressure) limit, just covers the upper pressure limit of the linear range of a small Pirana gauge. Notice how the left hand side of the
graph, at about 1Trorr, looks like its a straight line.
I am wg48 but not on my usual pc hence the temp handle.
Thank goodness for Fleming and the fungi.
Old codger' lives matters, wear a mask and help save them.
Be aware of demagoguery, keep your frontal lobes fully engaged.
I don't know who invented mRNA vaccines but they should get a fancy medal and I hope they made a shed load of money from it.
|
|
|