| Pages:
1
..
12
13
14
15
16
..
18 |
ManyInterests
National Hazard
   
Posts: 944
Registered: 19-5-2019
Member Is Offline
|
|
Quote: Originally posted by Microtek  | | Indeed, the sawdust bucket is an excellent way to iron out any problems with the caps before using them for anything bigger. Also for doing all the
experimentation you are itching to do with a quick turnover between iterations. |
This is true. Especially for the 0.5-0.9g loads. Anything bigger might blow the bucket open. I need to weigh down the lid to contain it. To stop it
from flying off and spreading too much stuff. Also putting it on a platform to catch the plate as it is pushed down is also good.
Anything bigger than what would be a no. 8 blasting cap needs to be done in field. Those run a.major risk of blowing my bucket apart.
The reason why I still have detonator issue is simply due to lack of opportunities to try them. Otherwise I would have figured it all out ages ago.
|
|
|
Microtek
National Hazard
   
Posts: 877
Registered: 23-9-2002
Member Is Offline
Mood: No Mood
|
|
Yes, I was talking about experiments with caps or similar sizes. The thing with HEs is that they also work on a very small scale, unlike LEs.
My point was that using the sawdust bucket you can test your cap design and tweak until you find something that works well in the plate penetration
test for multiple repetitions. Then you can bring that design to your testing site and be confident that the cap is not what is holding back your
test.
|
|
|
Laboratory of Liptakov
International Hazard
    
Posts: 1418
Registered: 2-9-2014
Location: Tel Aviv University
Member Is Offline
Mood: old jew
|
|
If you use wet sawdust, 2 short boards and a brick on the boards will serve (and will be enough) as a lid.....
Development of primarily - secondary substances: CHP (2015) neutral CHP and Lithex (2022) Brightelite (2023) Nitrocelite and KC primer (2024) Diper
60 (2025)
|
|
|
ManyInterests
National Hazard
   
Posts: 944
Registered: 19-5-2019
Member Is Offline
|
|
I just saw a new video by Dug on ETN (https://youtu.be/nayL7P1TztA) and I did have some questions about melt-cast ETN.
While I did melt-cast ETN (sometimes even superheating microgram sizes and saw them pop quite loudly), and I did have an incident where I accidentally
melt-cast ETN in hot water (and ended up recrystalizing the result to get it out of there!). I was curious that if melt-cast ETN that has been ground
back up and mixed is more difficult to detonate than it is previously or what?
Remember I melt-cast ETN in the blasting cap body that I wanted to use (both plastic and 304 stainless steel) and let it cool back down to room
temperature. Is that the same or what? I am just asking here.
In making more NHN. It won't be necessary for my next test caps since I have 3.29g left from the supply I made two years ago. Plenty to make the 1:1
mix. But I already made plenty of hydrazine sulfate in order to make for the future (and I hope I won't need to make hydrazine sulfate again for the
next few years, too).
|
|
|
Laboratory of Liptakov
International Hazard
    
Posts: 1418
Registered: 2-9-2014
Location: Tel Aviv University
Member Is Offline
Mood: old jew
|
|
Video is basically professional guide. Final pressing assemble is best what I saw ever. Thick wooden holder and the brick against wooden chips. Very
easy, quickly, smart, cheap. ETN grain (melting - crushing) has best properties for filling to cavity. Time 36:35.
And has very good sesitivity (grain 1x1 mm) for mixture ETN 50 + NHN 50% used as primary mixture.....
One from best video on ETN theme ever.
Development of primarily - secondary substances: CHP (2015) neutral CHP and Lithex (2022) Brightelite (2023) Nitrocelite and KC primer (2024) Diper
60 (2025)
|
|
|
ManyInterests
National Hazard
   
Posts: 944
Registered: 19-5-2019
Member Is Offline
|
|
Quote: Originally posted by Laboratory of Liptakov  | Video is basically professional guide. Final pressing assemble is best what I saw ever. Thick wooden holder and the brick against wooden chips. Very
easy, quickly, smart, cheap. ETN grain (melting - crushing) has best properties for filling to cavity. Time 36:35.
And has very good sesitivity (grain 1x1 mm) for mixture ETN 50 + NHN 50% used as primary mixture.....
One from best video on ETN theme ever. |
You could have told me that before hand!  I could have melt-cast the ETN and
crushed them before putting in my cap. I could have melt-cast the ETN and
crushed them before putting in my cap.
Previously what I would do is to put the ETN in the cap, put the cap in hot water to melt-cast. Is that as good a technique? I was also thinking that
if I was going to make a charge, would melt-casting in the container (with a dowel put in for a detonator well) be also the way it would go? Or would
it be better to just melt-cast the ETN previously, break it up, and put it the charge?
Anyway, I made 5 caps for testing. I put in 0.61g of powdered ETN and I pressed them in as hard as I could into the cap. I then topped them with 0.3g
of 1:1 ratio ETN/NHN as we spoke about before.
I learned some new stuff, like when putting them in, by tapping the outside of the cap I can cause the mixture to all settle nicely. I did not hard
press it, I simply tamped it slightly with no pressing. Not even 1kg of pressure. I hope this will allow it to fully detonate.
|
|
|
Laboratory of Liptakov
International Hazard
    
Posts: 1418
Registered: 2-9-2014
Location: Tel Aviv University
Member Is Offline
Mood: old jew
|
|
For mixture 1:1 is tapping not good idea. Because fine powder NHN fall down. Mixture will apparted partially. Also tapping for mixture 1:1 increase
density before hand pressing, which is contraproductive. Mixture must be sligtly pressed in one step but with bigger air gaps. Best is pour, shaking
and push 1Kg. For same reaseon for bigger air gaps is better using grain ETN and not fine powder ETN. This is not crucial condition, but can
increase reliability.
It is an insight from the study of the Nobel laboratories in the development of NPED.
[Edited on 11-3-2024 by Laboratory of Liptakov]
Development of primarily - secondary substances: CHP (2015) neutral CHP and Lithex (2022) Brightelite (2023) Nitrocelite and KC primer (2024) Diper
60 (2025)
|
|
|
ManyInterests
National Hazard
   
Posts: 944
Registered: 19-5-2019
Member Is Offline
|
|
Quote: Originally posted by Laboratory of Liptakov  | For mixture 1:1 is tapping not good idea. Because fine powder NHN fall down. Mixture will apparted partially. Also tapping for mixture 1:1 increase
density before hand pressing, which is contraproductive. Mixture must be sligtly pressed in one step but with bigger air gaps. Best is pour, shaking
and push 1Kg. For same reaseon for bigger air gaps is better using grain ETN and not fine powder ETN. This is not crucial condition, but can
increase reliability.
It is an insight from the study of the Nobel laboratories in the development of NPED.
[Edited on 11-3-2024 by Laboratory of Liptakov] |
understood about the tapping. At any rate, when I added the finely powdered NHN (it is dextrinated) to the mostly powered ETN, but it had a slight
chunk. I ground up the mixture some more and moved it around to fold them into each other. I believe it is a decently homogeneous mixture.
I did tamp, but it was very gentle, not even 1kg. I think it should have enough loose gaps between it to allow it to go off entirely. When I inserted
the e-match it probably pressed a little more, too, but I don't think it was that much. I added enough tape around the match to make a nice fit into
the cap, and to not allow the epoxy to seep into the sides and cause problems with the mixture. That is what caused the UXO cap for the previous test.
I'm going to glue these caps to the metal plates so I can just up and go when I need to test them out.
Quote: Originally posted by katyushaslab  | | Pressing at every addition is what I would recommend, that way you get better control of the densities of different regions. Having a high density
"output side" of secondary is good, but you want a lower density region between it and the primary to ensure a good transition, if that makes sense.
|
I just dug this up from earlier in the thread. I should have written that down.
[Edited on 11-3-2024 by ManyInterests]
|
|
|
ManyInterests
National Hazard
   
Posts: 944
Registered: 19-5-2019
Member Is Offline
|
|
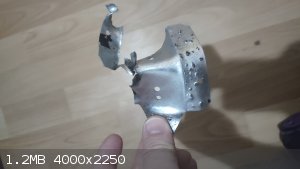
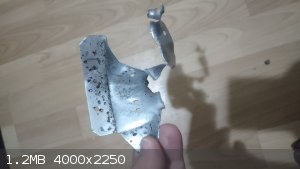
Posting the results of my latest trip.
I will write my comments on the 2nd post. I got a lot of pictures to share.
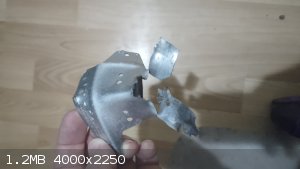 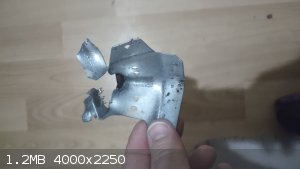 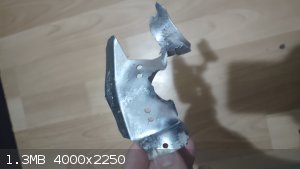 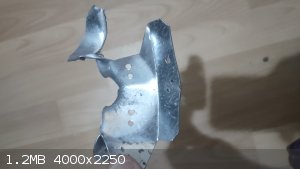  
|
|
|
ManyInterests
National Hazard
   
Posts: 944
Registered: 19-5-2019
Member Is Offline
|
|
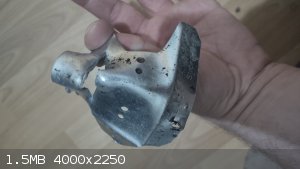
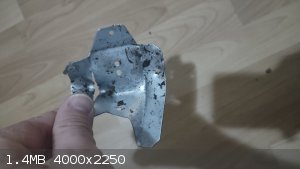
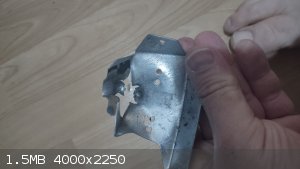
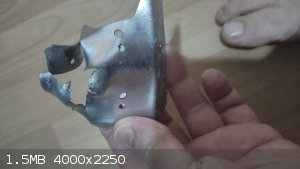
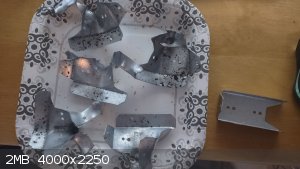
So this test was a far bigger success that before. I am quite happy with what is going on here. While I understand that clean holes are a good sign, I
am not sure if that can happen with these plates. This is because I am resting it on a part of the metal, and as the explosion goes down, it will take
that part with it. I suppose finding a straight piece of metal to do that on would help, but I am seeing serious damage here...
all the detonators used 0.6g of hand pressed ETN (Pressed as tightly as I could) and 0.3g of 1:1 ETN/NHN mix that is only tamped down gently.
|
|
|
Sir_Gawain
Hazard to Others
  
Posts: 462
Registered: 12-10-2022
Location: [REDACTED]
Member Is Offline
Mood: Stable
|
|
That looks great!
As I mentioned earlier, you need to get some lead blocks to test with. It gives much better comparison than holes in a steel plate. You can easily get
large amounts of lead from firing ranges. Also, tire shops will sometimes give you used wheel balancing weights.
“Alchemy is trying to turn things yellow; chemistry is trying to avoid things turning yellow.” -Tom deP.
|
|
|
OneEyedPyro
Hazard to Others
  
Posts: 280
Registered: 7-10-2015
Member Is Offline
Mood: No Mood
|
|
Quote: Originally posted by ManyInterests  | So this test was a far bigger success that before. I am quite happy with what is going on here. While I understand that clean holes are a good sign, I
am not sure if that can happen with these plates. This is because I am resting it on a part of the metal, and as the explosion goes down, it will take
that part with it. I suppose finding a straight piece of metal to do that on would help, but I am seeing serious damage here...
all the detonators used 0.6g of hand pressed ETN (Pressed as tightly as I could) and 0.3g of 1:1 ETN/NHN mix that is only tamped down gently.
|
Those are framing mounts/braces for 2X4 boards, I assume? Not bad results at all for hand pressed considering how sturdy those braces are. To give the
best idea of performance you should use a larger piece of a weaker, more ductile material like a lead plate as Gawain said. Consider buying a couple
boxes of shotgun shells to melt into a block, two boxes of cheap 12 gauge shells only costs $15 yielding about three pounds of lead and roughly 50
grams of DBSP.
This is assuming you live somewhere like the US.
|
|
|
ManyInterests
National Hazard
   
Posts: 944
Registered: 19-5-2019
Member Is Offline
|
|
Quote: Originally posted by OneEyedPyro  | Quote: Originally posted by ManyInterests  | So this test was a far bigger success that before. I am quite happy with what is going on here. While I understand that clean holes are a good sign, I
am not sure if that can happen with these plates. This is because I am resting it on a part of the metal, and as the explosion goes down, it will take
that part with it. I suppose finding a straight piece of metal to do that on would help, but I am seeing serious damage here...
all the detonators used 0.6g of hand pressed ETN (Pressed as tightly as I could) and 0.3g of 1:1 ETN/NHN mix that is only tamped down gently.
|
Those are framing mounts/braces for 2X4 boards, I assume? Not bad results at all for hand pressed considering how sturdy those braces are. To give the
best idea of performance you should use a larger piece of a weaker, more ductile material like a lead plate as Gawain said. Consider buying a couple
boxes of shotgun shells to melt into a block, two boxes of cheap 12 gauge shells only costs $15 yielding about three pounds of lead and roughly 50
grams of DBSP.
This is assuming you live somewhere like the US. |
I am in Canada, however this won't be a problem. I have an RPAL (restricted possession and acquisition license), meaning I can legally obtain shotgun
shells if I need to. I actually do own a shotgun so it do get shells for target shooting. I use only slugs because the range does not allow buckshot.
However an easier alternative does exist here: https://shorturl.at/wzAER
Same price as you mentioned, at least 3lbs, and all available without any huss or fuss.
I think I want to see if I can put in 1g of melt-cast ETN in the cap and set it off. I do have some questions about melt-cast ETN.
what I did previously (with both plastic and now metal cap bodies) is to press the ETN inside the cap body and then partially submerge the cap in 70C
water (just enough for the part with the ETN to be surrounded by the water) and leave it for 7 minutes to allow for it to be completely molten, then
CAREFULLY remove it and place it in the hole in a foam block that I made to support the cap, then let it stay for 30 minutes or so to make sure that
everything has cooled down and solidified to room temperature.
But after seeing another video on the matter, I did see using small quantities of ETN on parchment paper over warm water (heated to 60C), and then
breaking up the pieces after they fully cool and solidify.
LL mentioned that melt-cast ETN that has been ground back up into powder would make a superior mixture with NHN as boosted primary.
but my question is pressing said melt-cast powdered ETN into a detonator housing. Is it easier or harder to set off than ETN melt-cast within the body
itself? Would it be superior as an output to press it or is melt-casting in-body sufficient?
Edit: What is DBSP?
[Edited on 17-3-2024 by ManyInterests]
|
|
|
fx-991ex
Hazard to Others
  
Posts: 102
Registered: 20-5-2023
Member Is Offline
|
|
Lead for shotgun shell usually is hardened with antimony and sometime some tin, instead of buying shell and taking them apart you can buy buckshot
lead for reloading.
But you can get muzzleloader pure lead ball  . .
|
|
|
OneEyedPyro
Hazard to Others
  
Posts: 280
Registered: 7-10-2015
Member Is Offline
Mood: No Mood
|
|
Melt cast ETN that has been crushed will have a higher packing density and thus higher output than recrystallized powder when hand pressing but it
will have a higher sensitivity to initiation than a solid melt cast.
In terms of energy density and VoD a solid melt cast will always be the most powerful.
Crushed up molten ETN gives good power, ease of detonation and is easy to handle since it flows smoothly when pouring whereas fluffy crystals do not.
A fine powder pressed to a moderate density should have higher sensitivity than crushed up cast ETN but that doesn't necessarily apply in the voodoo
art of making reliable NPEDs.
DBSP is just short for double base smokeless powder. Shotgun powders tend to use less burn rate inhibitors and have more NG content. It's a
respectably powerful HE in its own right and is certainly worth saving if you're going to scrap shotgun shells. The above post is correct though. Lead
shot isn't pure, soft lead but it beats galvanized steel as a test medium for caps.
|
|
|
ManyInterests
National Hazard
   
Posts: 944
Registered: 19-5-2019
Member Is Offline
|
|
Ahh I should have known. Making DBSP (for pistols mostly) is a goal of mine for the future. This is why I want to make a lot of very high quality high
nitrogen NC to hopefully turn into home made power, using DEGDN as the energetic. But that is for another place and another time.
That being said, I will melt case some ETN (only 1g at a time and be VERY careful with it) and I will break it up not to load it within a cap, but to
mix it with NHN as LL said that it is the superior initiating agent. I think with that it should have no issue initiating sold-cast ETN.
And once that is done... I hope to happy to say that I am able to make detonators on par with the real stuff.
|
|
|
Laboratory of Liptakov
International Hazard
    
Posts: 1418
Registered: 2-9-2014
Location: Tel Aviv University
Member Is Offline
Mood: old jew
|
|
I estimate, that steel plate is only 1mm of thickness. Is it slim plate. For 0.6g output ETN is necessary 3mm steel plate. Or 1/10 of inch.
Therefore are results difficulty read. On this weak plate.
For 0.3 - 0.4 g ETN is best 2 mm steel plate. At inner diameter 7 mm.
Best is of course the Lead block. Is it cheapest solution ever. With exact results.
But I've been repeating this here for at least 1 year.....
Development of primarily - secondary substances: CHP (2015) neutral CHP and Lithex (2022) Brightelite (2023) Nitrocelite and KC primer (2024) Diper
60 (2025)
|
|
|
ManyInterests
National Hazard
   
Posts: 944
Registered: 19-5-2019
Member Is Offline
|
|
Quote: Originally posted by Laboratory of Liptakov  | I estimate, that steel plate is only 1mm of thickness. Is it slim plate. For 0.6g output ETN is necessary 3mm steel plate. Or 1/10 of inch.
Therefore are results difficulty read. On this weak plate.
For 0.3 - 0.4 g ETN is best 2 mm steel plate. At inner diameter 7 mm.
Best is of course the Lead block. Is it cheapest solution ever. With exact results.
But I've been repeating this here for at least 1 year.....
|
OK, I will get some lead and melt it with my blowtorch to make blocks.
I want to use the melt-cast ETN to mix with NHN and try to set off solid-cast ETN. Since melt-cast ETN doesn't take up a lot of space, I think I can
fit a full 1g within a 50mm cap.
How big of a lead block do I need? Would a cupcake mold work? I have a small crucible that I will post pics of. I saw this video as a guide (https://youtu.be/AmAwEsB-ADs) I hope it will be easy to get the lead block out of the ceramic...
|
|
|
dettoo456
Hazard to Others
  
Posts: 250
Registered: 12-9-2021
Member Is Offline
|
|
I personally wouldn’t recommend the lead block method, simply because it’s unnecessarily toxic and the reproducibility can be variable (getting
the dimensions and casting density of the lead accurate each time).
If you can find a piece of leaf spring steel, just cut a piece off (maybe 100x75x3mm), bend it straight, glue to a piece of thick wood, and use as a
witness plate. You can stick the witness plate in a bucket and fill with vermiculite to get a decent testing apparatus.
With lead you’d be left with atomized bits all over the place and re-melting would be a headache.
|
|
|
OneEyedPyro
Hazard to Others
  
Posts: 280
Registered: 7-10-2015
Member Is Offline
Mood: No Mood
|
|
Quote: Originally posted by dettoo456  | I personally wouldn’t recommend the lead block method, simply because it’s unnecessarily toxic and the reproducibility can be variable (getting
the dimensions and casting density of the lead accurate each time).
If you can find a piece of leaf spring steel, just cut a piece off (maybe 100x75x3mm), bend it straight, glue to a piece of thick wood, and use as a
witness plate. You can stick the witness plate in a bucket and fill with vermiculite to get a decent testing apparatus.
With lead you’d be left with atomized bits all over the place and re-melting would be a headache. |
Shooting steel targets with a shotgun makes a huge cloud of lead dust, this is done hundreds if not thousands of times in a single day in competitive
3 gun shooting matches. You don't hear about anyone getting lead poisoning.
I think it's reasonable to go out of your way to avoid inhaling or ingesting lead but it's still the standard for testing EMs and it works extremely
well. Steel is just too hard/tough to give a good picture as a witness plate.
|
|
|
ManyInterests
National Hazard
   
Posts: 944
Registered: 19-5-2019
Member Is Offline
|
|
I want accurate results. My personally set goal is that I want to make a detonator that is on par with military or commercial detonators. So if I need
to use lead blocks, I'll do it.
But remember, i will still be likely doing my tests outside. I found a nice secluded spot where I think I can do my tests without bothering anyone.
Albeit I don't want any lead contamination where I am setting the stuff off. But then again, what I am doing is so small it is ultimately meaningless.
I looked at Sir_Gawain's lead block, based on the nickel he used as a comparison it is 70mm tall, but how thick?
|
|
|
Sir_Gawain
Hazard to Others
  
Posts: 462
Registered: 12-10-2022
Location: [REDACTED]
Member Is Offline
Mood: Stable
|
|
It’s actually a cylinder. It was cast in a regular soup can, so it’s about 7 cm in diameter. Also, you don’t have to test the detonator inside a
lead block like I did. It’s probably easier to just use it in the same way as you did with the steel plate, then compare craters.
“Alchemy is trying to turn things yellow; chemistry is trying to avoid things turning yellow.” -Tom deP.
|
|
|
ManyInterests
National Hazard
   
Posts: 944
Registered: 19-5-2019
Member Is Offline
|
|
Quote: Originally posted by Sir_Gawain  | | It’s actually a cylinder. It was cast in a regular soup can, so it’s about 7 cm in diameter. Also, you don’t have to test the detonator inside a
lead block like I did. It’s probably easier to just use it in the same way as you did with the steel plate, then compare craters.
|
The test plate that I use is probably not the best. The reason why I use it is because that bend provides an easy place to tape it to without needing
to construct a platform to stick it on. It is also very, VERY cheap. while some steel plates cost several dollars and some going for almost 10$ a
piece. These little bits I use are barely 50 cents, and since I need a lot of them, I just don't want to waste too much money.
The bend doesn't allow for much single 'downward' hole, since the explosion will obviously blow that side piece apart in various unpredictable ways.
It doesn't work best... but in all honest I have been seeing such progress (or at least I hope I have) that if it continues like this it'll be all
good.
Edit: I can and use a hunt's tomato paste can then to make the cylinder. But I would need to make multiple them... not really sure if I feel I need to
be that precise. I think the tests are going fine so far.
[Edited on 19-3-2024 by ManyInterests]
|
|
|
EF2000
Hazard to Others
  
Posts: 153
Registered: 10-5-2023
Location: The Steppes
Member Is Offline
Mood: Taste testing the Tonka fuel
|
|
Quote: Originally posted by ManyInterests  |
Edit: I can and use a hunt's tomato paste can then to make the cylinder. But I would need to make multiple them... not really sure if I feel I need to
be that precise. I think the tests are going fine so far.
[Edited on 19-3-2024 by ManyInterests] |
You don't need multiple lead blocks for multiple tests. You can cast a thick lead plate. Look at the picture at quoted post by our great genious
Liptakov:
Quote: Originally posted by Laboratory of Liptakov  | Lead block is pretty good compromise for comparative testing.
However during measurement, in same block, is necessary always create reference impact from known EM. As reference is here CHP.... ...LL ...LL |
One lead block, enough place for multiple tests without remelting, easy comparison of craters.
And if one is too concerned with lead toxicity, they can always experiment with other soft metals and alloys, tin for example.
Wroom wroom
"The practice of pouring yourself alcohol from a rocket fuel tank is to be strongly condemned encouraged"
-R-1 User's Guide
|
|
|
untrained professional
Harmless

Posts: 3
Registered: 4-3-2024
Member Is Offline
|
|
Are aluminum blocks good for testing I have many cast aluminum ingots on hand but I can also use mild steel that’s about 2.9 mm thick
|
|
|
| Pages:
1
..
12
13
14
15
16
..
18 |