woelen
Super Administrator
        
Posts: 8041
Registered: 20-8-2005
Location: Netherlands
Member Is Offline
Mood: interested
|
|
Spontaneous appearance of cracks in ampoules
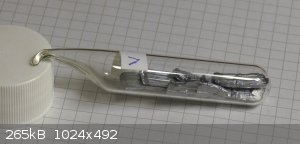
Recently I made ampoules from test tubes (standard format, appr. 15 cm length and diameter of 16 mm) of several element samples, like the one shown
here:

These ampoules look very nice, but unfortunately, some of them (I think appr. one out of 5) looks fine when created, but one or two days later there
is a crack near the tip, where the test tube is sealed. The crack appears spontaneously, while the ampoule is just on a table without being moved or
touched. Sometimes the crack is very thin and short, sometimes it is large and so severe that simply picking up the ampoule causes the tip to fall
off.
What can be done to assure that such cracks do not occur? It is a great nuisance. And what could happen with the other ampoules. Could they have
cracks lateron, or can I be sure that if no cracks form in the first few days that they will not appear later on?
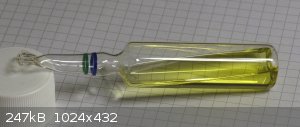
I also made another type of ampoule, and with these I do not have such issues. These ampoules are made intentionally as ampoules:

When this type is OK, then it remains OK, I never had appearance of cracks one or two days after sealing.
|
|
|
JJay
International Hazard
    
Posts: 3440
Registered: 15-10-2015
Member Is Offline
|
|
I made several of the first kind yesterday, and I noticed similar cracks before they were sealed. They seemed to be less of a problem when I moved the
flame side to side while rotating the test tube, melting a broader band of glass when forming the ampule. But one of the ampules that I formed by
moving the flame side to side broke when I picked it up as well.
|
|
|
XeonTheMGPony
International Hazard
    
Posts: 1641
Registered: 5-1-2016
Member Is Offline
Mood: No Mood
|
|
you need to anneal them after the bending to destress the glass, then once cool you can fill and seal and it should reduce the cracking.
|
|
|
woelen
Super Administrator
        
Posts: 8041
Registered: 20-8-2005
Location: Netherlands
Member Is Offline
Mood: interested
|
|
What you write is not possible. The objects in the ampoules are too big to put in after the bending. I fill the test tubes and then I melt the test
tubes at appr. 1/3 to 1/2 length, measured from the top. The glass melts at that place, while it remains cool near the bottom and quite some length
upwards (so the sample remains good, I can even ampoule stuff like iodine without melting or evaporation). When the glass melts, I keep the flame at
the same place and draw the open end slowly away from the part, which will become the ampoule. In this way, the glass contracts and when it only is
half a cm wide or so, I stop moving and continue heating until a seal is reached. Then I withdraw the open end of the test tube and heat the tip of
the ampoule to make it have a rounded tip (otherwise it tends to form long thin "wires" of glass). This method works very well, nearly 100% of the
test tubes can be made into an ampoule in this way succesfully and the ampouled substance remains cool during the process.
|
|
|
Dr.Bob
International Hazard
    
Posts: 2781
Registered: 26-1-2011
Location: USA - NC
Member Is Offline
Mood: Mildly disgruntled scientist
|
|
If you can anneal the top seal once it is sealed, by heating it gently with a yellow flame (little or no oxygen), and cool it slowly, that is ideal,
but hard to do with material in the vial. Sealing an ampule like that is very tough, I often took several tries when I was doing it years ago, and I
had access then to a glass shop, good torch, glass blowing class, and a mentor. I would just figure that 5 out of 6 is not bad.
If you need more ampules, let me know, I have lots, in 1 and 2 ml, maybe even some bigger ones.
|
|
|
brubei
Hazard to Others
  
Posts: 188
Registered: 8-3-2015
Location: France
Member Is Offline
Mood: No Mood
|
|
Quote: Originally posted by woelen  | | Recently I made ampoules from test tubes (standard format, appr. 15 cm length and diameter of 16 mm) of several element samples, like the one shown
here: |
are these tubes made from sodium or boron silicate ? and how about the thickness ?
there are many standard...
|
|
|
woelen
Super Administrator
        
Posts: 8041
Registered: 20-8-2005
Location: Netherlands
Member Is Offline
Mood: interested
|
|
Thickness: two types, one with 0.6 mm thickness and one with 0.8 mm thickness.
Problem with cracks exists for both kinds.
I used the cheapest kind of test tubes available, I do not know what type of glass they are. The glass melts fairly easily, no superstrong heating
needed. A normal propane torch from a hardware store does the job without problems.
|
|
|
Artemus Gordon
Hazard to Others
  
Posts: 178
Registered: 1-8-2013
Member Is Offline
Mood: No Mood
|
|
I am not a glass expert, but I agree with Dr. Bob about gentle heat and slow cooling. I found <a
href="http://www.dragonbeads.com/anneal.html">this</a>, which talks about dealing with thermal shock without using an annealing oven. The
idea to bury the glass in an old crock pot (or even a flower pot) filled with vermiculite or perlite sounds easy and plausible.
[Edited on 18-3-2016 by Artemus Gordon]
|
|
|
aga
Forum Drunkard
    
Posts: 7030
Registered: 25-3-2014
Member Is Offline
|
|
I think this may be related to the notion of 'tempering' glass, which i assume is similar to metals, where the heating/cooling cycles determine the
eventual solid structure, and therefore it's properties.
There must be some explanation for the use of the term 'Tempered Glass'.
|
|
|
Artemus Gordon
Hazard to Others
  
Posts: 178
Registered: 1-8-2013
Member Is Offline
Mood: No Mood
|
|
Quote: Originally posted by aga  | I think this may be related to the notion of 'tempering' glass, which i assume is similar to metals, where the heating/cooling cycles determine the
eventual solid structure, and therefore it's properties.
There must be some explanation for the use of the term 'Tempered Glass'. |
Tempered glass is glass that has been treated, either with heat or diffusion of larger atoms into the surfaces, to put the surfaces into compression
while the inner material is placed into tension. This toughens the glass and when broken, it breaks into cubic fragments which are much safer. Car
windows are tempered glass.
Annealing glass involves heating and slow cooling to allow thermal stresses to relax. Both processes involve manipulating stresses in the glass, but
tempering puts intentional stress in the glass and annnealing removes stress from the glass.
|
|
|
aga
Forum Drunkard
    
Posts: 7030
Registered: 25-3-2014
Member Is Offline
|
|
Ah. Thanks for that explanation Artemus.
|
|
|