| Pages:
1
2
3
..
5 |
thatlittleguy
Harmless

Posts: 2
Registered: 19-12-2004
Location: take a left at the 3rd red light past BFE.
Member Is Offline
Mood: unknown, but it
|
|
DIY magnetic stirrer
I have seen plans for a home-brew mag. stirrer that many of you are probably pretty well familiar with. Has anyone out there tried to place this in
the body of a hotplate? Success or no? Elec. motors don't like heat, do they? maybe a ceramic plate in between?
E.b.C: Title
[Edited on 15-4-2005 by chemoleo]
|
|
|
thatlittleguy
Harmless

Posts: 2
Registered: 19-12-2004
Location: take a left at the 3rd red light past BFE.
Member Is Offline
Mood: unknown, but it
|
|
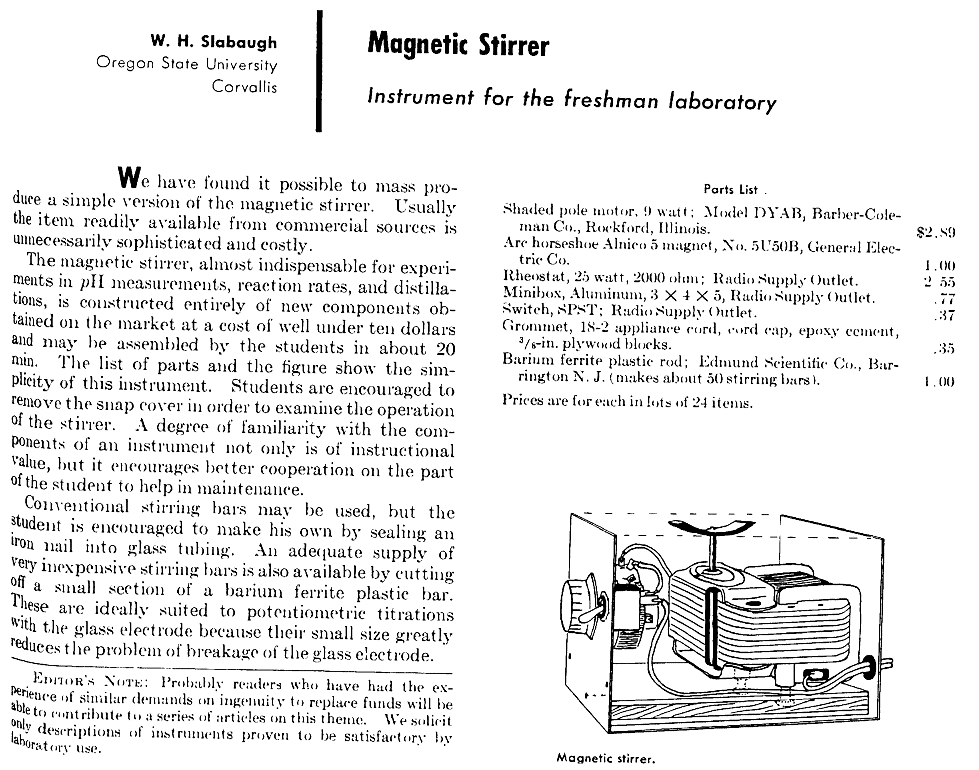
Well....maybe not so pretty well familiar. I'll try attaching it?
|
|
|
BromicAcid
International Hazard
    
Posts: 3272
Registered: 13-7-2003
Location: Wisconsin
Member Is Offline
Mood: Rock n' Roll
|
|
Before I invested in a good hotplate stirrer I used a home aid stirring mechanism in tandem with a range coil heater. I would take the range and sit
it directly on top of my encased electric stirrer and never had a problem stirring the mixture on the other side of the heating element. I never
thought to combine the two because some things needed stirring without heating, and some heating without stirring and I thought it novel that I could
do each individually, additionally my stirring mechanism took a 12 V power source and the hot plate 120V so there would have still been two plugs. In
my organic chemistry class we also took our heating mangles and set them on stirring apparatuses stirring through the heating mantle. It was just
easier this way.
As for incorporation, the inside of a hotplate isn't too bad, there is a metal plate below the actual coil, and heat has a tendency to rise, so
if you put the mechanism within, as long as it didn't come into contact with the reflective plate for the heat I wouldn't see a problem.
Just don't go using a sand bath. I realize that in order to add your attachment you had to make another post, but please be mindful of adding
attachements in the first place. Yes, many of use know of that design from rhodium, also, many of us could come up with something similar on our own.
[Edited on 12/20/2004 by BromicAcid]
|
|
|
The_Davster
A pnictogen
      
Posts: 2861
Registered: 18-11-2003
Member Is Offline
Mood: .
|
|
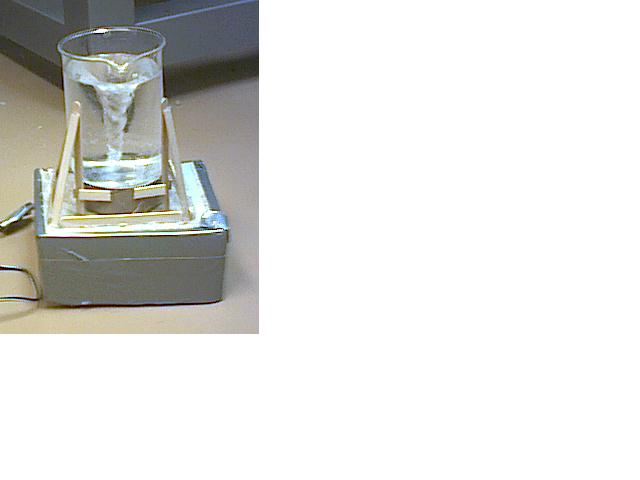
Here is something I made a year or so ago. The beaker size is 600mL.
Be kind
|
|
|
jimwig
Hazard to Others
  
Posts: 215
Registered: 17-5-2003
Location: the sunny south
Member Is Offline
Mood: No Mood
|
|
somewhat vague but you may get the idea:
http://www.geocities.com/jimwig2000/diy-mag-stirrer.html
all the parts except the motor and housing are present in most discarded speakers.
[Edited on 23-1-2005 by jimwig]
|
|
|
Mendeleev
Hazard to Others
  
Posts: 237
Registered: 25-12-2003
Location: USA
Member Is Offline
Mood: stoned
|
|
| Quote: |
Here is something I made a year or so ago.
|
Ha ha ha he *snort* *tear* ha ha ha.
Ahem, sorry, I really like it, it's just kind of funny  . .
|
|
|
frogfot
Hazard to Others
  
Posts: 212
Registered: 30-11-2002
Location: Sweden
Member Is Offline
Mood: happy
|
|
The main problem with conventional hot plate and a magnetic stirrer is the shielding of magnetic field.. so the plate should be done out of aluminium
(or other nonmagnetic metal).
The only source for this I could find was from 1,3kW iron (all modern irons have Al heating plates). But since it had a safety on about 225*C I was
afraid to heat it further.. Any idea if such heating plates will survive if set on maximum (directly to 230V)?
Would be great to put one of those plates on a homemade dimmer..
|
|
|
chemoleo
Biochemicus Energeticus
    
Posts: 3005
Registered: 23-7-2003
Location: England Germany
Member Is Offline
Mood: crystalline
|
|
Well i wouldn't quite do that.
You might want to take out the coil/resistance heater, and connect it to the mains with a powerregulator before that. Most can bear low red heat. I
am sure you will find a powersetting that keeps this at low red heat.
Didn't someone post a nice stirrer before, from brainfever?
[Edited on 25-1-2005 by chemoleo]
Never Stop to Begin, and Never Begin to Stop...
Tolerance is good. But not with the intolerant! (Wilhelm Busch)
|
|
|
bio2
Hazard to Others
  
Posts: 447
Registered: 15-1-2005
Member Is Offline
Mood: No Mood
|
|
Irons also make good melting point apparatus!
The irons I have seen have the element integral (cast) as part of the assembly. So good luck trying to remove the wire!
These should easily take 400-500deg but would likely burn-out running flat out especially with no load. Take your triac phase controller (dimmer)
rated at least to the full output and determine the setting required for the temp you want. Then put a resistor (trim pot) in series with the main
pot to limit the maximum output. You could also feed a half wave rectifier to reduce the ouput by about half or use a NTC thermistor (surge limiter
type) in series to not only give a soft start but also a series resistance. Most commercial heating mantles are designed for a maximum element temp of
450deg. If you can see the end of the wire and determine the guage then calc the temp. I posted a NiCr wire helix calculator a few days ago that makes
this very easy.
Good luck and don't forget Ohms Law or you will be producing a lot of smoke.
|
|
|
frogfot
Hazard to Others
  
Posts: 212
Registered: 30-11-2002
Location: Sweden
Member Is Offline
Mood: happy
|
|
Bio, you're right, it's cast.
If it can take up to 500*C, it's nearly as a kitchen stove.
Reason I thoat that it would be ok to connect it directly to 230V is because that's how the iron was made originally.. Temp in my iron is
controlled by a small bimetal piece, so coil have only two modes, on and off.
I also think that wire reaches it's highest temp in seconds, so logically thinking, it actually shouldn't matter for how long I will keep it
on maximum setting.. it have to be designed for maximum power!
Making a good heat isolation from the electronics/magnet is another story..
I'm not so good in electronics.. do you think that triac phase controller schematics in this pdf (fig 1, application schematic) is ok in my
application:
http://www.onsemi.com/pub/Collateral/UAA2016-D.PDF
Though I don't really understand what's NTC resistance for..
|
|
|
The_Davster
A pnictogen
      
Posts: 2861
Registered: 18-11-2003
Member Is Offline
Mood: .
|
|
| Quote: | Originally posted by Mendeleev
Ha ha ha he *snort* *tear* ha ha ha.
Ahem, sorry, I really like it, it's just kind of funny  . .
|
Hey, it is not THAT funny, the popsicle sticks keep the beaker from vibrating off the surface. If you think that is bad before I put lead weights
under the cardboard box that it is construced out of the damn thing would run around on the table.
And the ducttape, that is just for the aesthetic appeal, and waterproofing, the thing is made of cardboard after all
This will just make everyone laugh harder  
PS: I do have plans to make a metal one but that is on a very long 'to do' list.
[Edited on 26-1-2005 by rogue chemist]
|
|
|
bio2
Hazard to Others
  
Posts: 447
Registered: 15-1-2005
Member Is Offline
Mood: No Mood
|
|
http://www.teccor.com/cgi-bin/r.cgi/prod_series.html?LFSESSI...
Check out the app. notes on this page. All you will ever need to know to design phase controllers. The zero switch is to minimize RF interference and
is not essential or required.
Just get the cheapest dimmer you can find that has a wattage rating near your load but this is not so easy as most are 600w.
However if you can find the el-cheapo $3 ones then get a couple and find the rating of the triac. Some actually have 8amp triacs but are downrated
because the heat sink is so small. Advantage here is you have the board, pot, enclosure etc. so it's easy to add just a few parts and make it
really usefull. If you like doing this kind off stuff then get a temp sensor and a optical isolator for a variable power temp controller. I have a few
made from the hardware store junk (IMHO) dimmers. You can pick up a 20A triac these days for just a few bucks. I have a nice 3phase 480V one using
the 40A alternistor triacs. Now that's usefull wattage and it turns down to 2%. Check my other posts on this. Have fun!
More later kinda busy
|
|
|
frogfot
Hazard to Others
  
Posts: 212
Registered: 30-11-2002
Location: Sweden
Member Is Offline
Mood: happy
|
|
How about an external electrical magnetic stirrer? I've drawed the whole thing to ease the explanation:
http://img.photobucket.com/albums/v113/frogfot/magnstir.gif
So we got an iron ring with 4 fat bolts. 4 coils are winded on those bolts. By simply changing the current direction (as given in pic) we can rotate a
magnet inside. Just like in a stepper motor..
The iron ring can be easily done from a "construction band", sold in hardware store.. Purpose of it is to "transport" magnetic
field. Well it should be more effective that way.
Though I dunno how big currents this thing would eat.. probably alot..
This thing would have many advantages, if it could work that is.. It can be placed on any stove/hotplate (couple of cm of air is enough isolation).
There are no moving parts..
Is there a chance it will work?
Btw, still didn't make any dimmer..
[Edited on 15-2-2005 by frogfot]
|
|
|
Quince
National Hazard
   
Posts: 773
Registered: 31-1-2005
Location: Vancouver, BC
Member Is Offline
Mood: No Mood
|
|
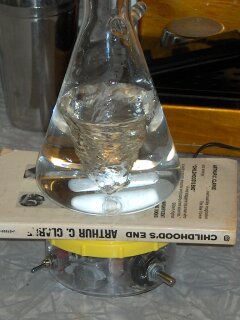
Not to fall behind, I built this little guy, shown in the attachment on the slowest setting:
\"One of the surest signs of Conrad\'s genius is that women dislike his books.\" --George Orwell
|
|
|
Quince
National Hazard
   
Posts: 773
Registered: 31-1-2005
Location: Vancouver, BC
Member Is Offline
Mood: No Mood
|
|
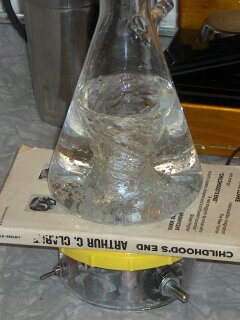
And this attachment shows the fastest setting:
\"One of the surest signs of Conrad\'s genius is that women dislike his books.\" --George Orwell
|
|
|
Quince
National Hazard
   
Posts: 773
Registered: 31-1-2005
Location: Vancouver, BC
Member Is Offline
Mood: No Mood
|
|
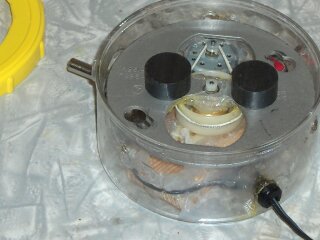
The last attachment shows the insides. The power is from a small 9 V DC wall wart. Notice how small the motor is, yet it was still going too fast
(this was true with any motors), so I used a 3:1 geardown (the rubber band), which makes speed more reasonable and increases torque, so the heavy
plate and magnets speed up faster.
A better stirrer would use induction drive, as you see in aquarium pumps, and would thus have no moving parts to wear down.
\"One of the surest signs of Conrad\'s genius is that women dislike his books.\" --George Orwell
|
|
|
BrAiNFeVeR
Harmless

Posts: 42
Registered: 23-5-2002
Location: Belgium
Member Is Offline
Mood: busy
|
|
Let me show off my latest project:
http://www.geocities.com/brainfevert/heatstir.html
In the link above you will find my totally homemade heater/stirrer combo unit.
Comments or questions are welcome.
|
|
|
Quince
National Hazard
   
Posts: 773
Registered: 31-1-2005
Location: Vancouver, BC
Member Is Offline
Mood: No Mood
|
|
Nice! Now you just need a PID temperature controller...
LOL, when I first opened the page, I thought the first picture was it.
\"One of the surest signs of Conrad\'s genius is that women dislike his books.\" --George Orwell
|
|
|
BrAiNFeVeR
Harmless

Posts: 42
Registered: 23-5-2002
Location: Belgium
Member Is Offline
Mood: busy
|
|
temperature controlling seemed kinda hard to fit in ... but I may add an IR thermometer later.
Making the digital IR thermometer control the varistor sounds pretty hard to do though ...
If you have interesting hints or ideas about this I'd love to hear them.
I'm baptising the mantle today with it's first destillation 
|
|
|
Quince
National Hazard
   
Posts: 773
Registered: 31-1-2005
Location: Vancouver, BC
Member Is Offline
Mood: No Mood
|
|
You can always add it later. Here's my plan, and I will post a circuit when I finish it (I have a queue of a few other project to finish first,
though...)
Now, you said you will using an infrared sensor. My question to you is, since you are not dealing with a blackbody due to reflected light (some will
be reflected in IR), wouldn't this be inaccurate at low temperatures? Why not use a thermocouple?
For temperature control, you can buy a PID for $100-$150. The advantage is that it is programmable. The disadvantage is that it's not DIY and
the money could be spent on better things.
I plan to build my own. First I need an electronic thermometer. I will use a thermocouple, and its cold junction temperature will be known because
I'll use an LM335 sensor besides it, and a simple circuit will give me Centigrade scale temperature accurate to about 1*C. The output goes into
the PID circuit (a voltmeter can be attached for a display so you don't need another thermometer to read off). The thermocouple probe is best
enclosed in glass, but I'll just use Teflon, since I haven't gotten the hang of melting glass yet...
The details of making a simple PID are shown here:
http://www.sensorsmag.com/articles/0504/52/main.shtml
The reason you don't just want proportional (P) is that the slow response of the system (long chain: heater-to-flask-to-solution-to-thermocouple)
means there will be too much overshooting and temperature instability, in my opinion. The extra control is nice, in any case; for example, consider
that when you are boiling, you want to adjust the heating rate, rather than the controller just pumping at max because it's trying to reach some
temperature that's impossible until the liquid boils off. All those variable resistors in Fig 1 are controls.
The output of this drives a PWM (can be made with a mere NE555) and that drives the optocoupler (safety first!) and then the heater's triac.
Using a SPICE simulator makes for less troubleshooting during build time. Linear's SwitcherCAD III is a good free one. If you have a few grand
to burn, go for Micro-Cap 8   
[Edited on 17-3-2005 by Quince]
\"One of the surest signs of Conrad\'s genius is that women dislike his books.\" --George Orwell
|
|
|
BrAiNFeVeR
Harmless

Posts: 42
Registered: 23-5-2002
Location: Belgium
Member Is Offline
Mood: busy
|
|
First off, I'm not all that good with electronics, so I could make very little of the last part of your post. (from "the output" on)
Secondly, any sensor that would require to be inside the liquid is impossible as that will make my destillation setup (the projects main goal) no
longer airtight (no fun with HNO3).
I have absolutely NO cash to burn. Anything going over €50 is out of the question for this project.
During first destillation tests, I regulated the current by hand, and found this fairly reliable.
One possibility might be to place the thermocouple in the position of the NS14 Hg-thermometer.
If one where to automate the destillation proces, could it be something like this?:
At the beginning, it will give full heating power (3 to 4 Amps) untill T reaches a set point, at which the unit sets the power back to a set
"cruise power" (1.75 to 2.5 Amps).
If the temperature drops, cruise power setting is altered to a slightly higher value. If the temperature rises beyond a certain point, power is turned
off completely, and a signal is given that the destillation proces is complete.
|
|
|
BrAiNFeVeR
Harmless

Posts: 42
Registered: 23-5-2002
Location: Belgium
Member Is Offline
Mood: busy
|
|
<pm Quince>
Subject: Re: DIY mag. stirrer
From: Quince
To: BrAiNFeVeR
Sent: 22-3-2005 at 03:27
Message: I am replying by U2U since I can't post. Perhaps you can help me and ask Vulture to reinstate my posting ability.
The thermocouple can be inserted as any glass/mercury thermometer. A PTFE or glass tube is all you need (probably easier to seal the glass). Then just
use it with your thermometer adapter and you can have an airtight seal.
The parts for the thermocouple/controller should add up to less than $20, with the possible exception of a temperature display (so you don't need
both thermocouple and thermometer). You can just use an old analog voltmeter for that.
Please post my reply in the thread so others can see it.
</pm Quince>
My reply:
First off; I'm no mod and I don't know why your ability to post was taken, but I can't do anything about it.
I'm aware of the existance and use of thermocouples and Pt100/1000, but any kind of temperature and destillation automatisation is too complex a
work for the seldom destillations I do.
It would take more research and work then it would be used distilling.
It would be a cool project, but finding the courage to commence with it (research and test) and see it trough (placement in my setup and regulating)
is not the kind of thing I see happening within a few months time.
|
|
|
Quince
National Hazard
   
Posts: 773
Registered: 31-1-2005
Location: Vancouver, BC
Member Is Offline
Mood: No Mood
|
|
Soldering the heater wire for a mantle is out of the question, as it will melt away. Pressure joints are problematic, as oxidation layers can form
between the surfaces, wrecking the connection eventually. Spot welding is difficult without the proper equipment. Best is to braze.
I had no brazing alloy, so I just used silver. I used the nichrome ribbon from a toaster, but put the parts in series instead of parallel as it was
in the toaster -- you don't need as high a temperature as the toaster reaches (plus, it is harder on the fiberglass loom). The silver melts
easily in a propane torch. It wouldn't stick well to the nicrhome, so I melted in just a bit of copper and solder. Regular soldering flux
doesn't work since it burns away too fast in the torch, so I used borax powder in a bit of alcohol. Overall, it worked great.
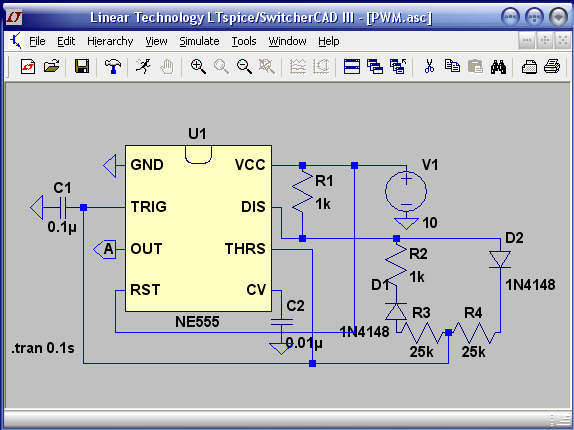
Driving a triac the usual way doesn't give power proportional to the potentiometer position. It's best to use a PWM to drive the triac. I
have attached a schematic of my solution; the two 25 K resistors represent a 50 K pot (actually a higher value gives more linear response, use 200 K
pot and change the 1 K resistors to 2 K). Adjust C1 to change the frequency.
The output is fed into the circuit of figure 7 or 8 here.
For electronic control, set the pot to the middle position, and feed a control voltage to the CV pin (range 0-Vcc). That allows control from say a
PID or computer or whatever.
\"One of the surest signs of Conrad\'s genius is that women dislike his books.\" --George Orwell
|
|
|
Quince
National Hazard
   
Posts: 773
Registered: 31-1-2005
Location: Vancouver, BC
Member Is Offline
Mood: No Mood
|
|
Forgot the attachment. For some reason, the edit feature doesn't allow me to add one.
\"One of the surest signs of Conrad\'s genius is that women dislike his books.\" --George Orwell
|
|
|
frogfot
Hazard to Others
  
Posts: 212
Registered: 30-11-2002
Location: Sweden
Member Is Offline
Mood: happy
|
|
Cool, that controller seems to be easy to make. I got some questions though..
What's the purpose of that MOC30xx thingy, is it really necessary? and where is it's input, is it on pin 2 instead of the AND?
Oh, and what's that round thingy "V1" in 555 timer circuit?
Sorry for all questions.. 
|
|
|
| Pages:
1
2
3
..
5 |