smaerd
International Hazard
    
Posts: 1262
Registered: 23-1-2010
Member Is Offline
Mood: hmm...
|
|
Building a Syringe Pump?
Ideally one would use a real syringe pump or an expensive linear actuator. I was wondering if anyone had any home-brew ideas? I came up with a simple
low-cost idea. Was wondering if anyone else had any better ideas.
My considered usage would be controlled reagent addition to flasks via rubber septums. There aren't too many advantages to doing it this way other
then it could provide a more uniform controlled addition then dripping and adjusting stop-cocks. Also it provides a hands off approach. Suppose a
peristaltic pump could easily replace this as well, but again they are cost heavy. It could also be used for slowly adding gasses.
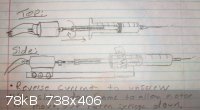
The idea is basically to secure a DC motor to a sliding door assembly. The motor, which has a screw thread fixed too it the length of the internals of
a syringe. A bit of metal tubing the same length. The length of a plungler of a syringe is cut leaving only the rubber and plastic disc. Fixing a
small length of metal tubing to the plunger disc with epoxy or similar adhesive. Fixing a hex-nut to the tubing with the same adhesive.
Then fix the whole assembly into a sliding door type thing. So that the syringe is fixed and the motor is on a wheel free to move. In this way the
syringe can be easily clamped to a ring-stand and the motor is free to move into the syringe.
I drew a quick schematic of the idea and yes I know it looks like it was drawn by a 6 year old  . .
[Edited on 13-12-2012 by smaerd]
|
|
|
kavu
Hazard to Others
  
Posts: 207
Registered: 11-9-2011
Location: Scandinavia
Member Is Offline
Mood: To understand is to synthesize
|
|
With low speeds DC-motors without gears tend to be problematic. Better control over speed and torque can be achieved using stepper motors. Also a
PID-control of some sort would be ideal to make sure the addition speed is constant over time.
|
|
|
Dr.Bob
International Hazard
    
Posts: 2734
Registered: 26-1-2011
Location: USA - NC
Member Is Offline
Mood: No Mood
|
|
Yes, I tried to buy some simple ones years ago, and it kinda worked, but was not very smooth. I used to use Harvard or Sage ones, they were OK.
The older ones were really good, made of meal and very sturdy. The newer ones are mostly plastic and not designed for use with any real chemicals, so
they don't like solvents or reagents.
I have found some simpler ways to avoid their use, such as diluting the reagent, so a addition funnel can be better used, using a normal syringe with
a weight on top of it, and using other tricks to keep the addition steady. You might be able to find a surplus one as well. But I am sure that you
can build one, it just may not be perfect. But what is?
|
|
|
smaerd
International Hazard
    
Posts: 1262
Registered: 23-1-2010
Member Is Offline
Mood: hmm...
|
|
This will probably sound pretty dumb, but I never really considered diluting in the addition funnel that's a good tip. Yea the goal really wasn't to
make something top of the line. In which case one might as well drop 80$ on a nice linear actuator and another 30$-50$ on the circuit, and at that
rate may as well buy one that functions surplus.
DC gear-box motors tend to offer nice torque, and are pretty affordable. Sure it wouldn't be a completely uniform addition. Then again I haven't tried
it yet, maybe it'll work out to be in an acceptable range.
Good point on the plastic, it appears that a glass syringe runs about 5$-$10 on ebay. I'll likely prototype with a plastic syringe though as I have a
few handy from when I was trying to gas HCl.
edit - I also realized using a wheel assembly is likely excessive, a metal post and fixing the motor around such would also suffice.
[Edited on 14-12-2012 by smaerd]
|
|
|
DJF90
International Hazard
    
Posts: 2266
Registered: 15-12-2007
Location: At the bench
Member Is Offline
Mood: No Mood
|
|
I like that you've posted about this. Its something that has been on my mind for a while now.... Somtimes diluting the reagent with solvent for slow
addition via dropping funnel isnt very practical... I once ran a Stille coupling in NMP, and it seemed to work better with slow addition of the
stannane substrate. Obviously minimising the solvent volume is a good idea, especially when its something difficult to get rid of like NMP (bp like
232*C or something!). So I settled for slow addition of the stannane in minimal NMP (5ml) via syringe pump, at a rate of 0.5ml/hr. Replicating
something like this with an addition funnel is just not practical, so it was a life saver really.
So back to the idea at hand. I suspect a DC motor with gearbox and using a worm gear for the driver (if necessary to attain the relatively slow speeds
and high torques) attached to a fine thread rod (something like a pitch of 0.5mm to 1mm) by a large (say 60 tooth; again for mechanical advantage)
gear. Two smooth parallel rods are used as a guide for the stage that the butt of the syringe sits on, which is fitted with a bolt that fits the
threaded rod. This is kept well greased to facilitate easy movement. Regulation of motor speed could be done with something like this: http://www.amazon.com/Motor-Speed-Controller-PWM-Kit/dp/B006...
EDIT: Check this... http://aonomus.wordpress.com/2010/04/02/diy-syringe-pump-ver...
[Edited on 14-12-2012 by DJF90]
|
|
|
watson.fawkes
International Hazard
    
Posts: 2793
Registered: 16-8-2008
Member Is Offline
Mood: No Mood
|
|
The cheapest way to get a small motor and gearbox is to use a hobbyist-grade servomechanism, such as the kind used in radio-controlled toy cars. Many
kinds can be modified for continuous rotation. Here's a close up of a partly disassembled servo, pulled half-randomly from a search. The position feedback mechanism in these is typically a potentiometer. I have seen
(but don't recall where offhand) conversions that use a scavenged mouse wheel for that purpose.
There's no need to use a stepper motor in this application. With steppers, you need good position at the end of each stepping sequence. For a syringe
pump, you have a lower standard of accuracy, which is that the integrated error in position remain within tolerance, not the instantaneous error. As
long as the control software runs a running tally of positions-sent and positions-moved, this is an easy task.
A small microcontroller board with an H-bridge driver add-on would do fine in this application. I'm familiar with Arduino for such tasks, and there
are already off-the-shelf motor driver add-ons for it. Arduino is already equipped to interpret the serial signals from a repurposed mouse.
|
|
|
smaerd
International Hazard
    
Posts: 1262
Registered: 23-1-2010
Member Is Offline
Mood: hmm...
|
|
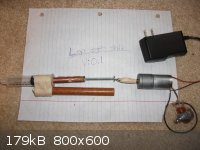
So I did a test-run I christened the first device: Lop of shit Ver 0.1
What I didn't realize in planning was that the motor and the syringe should be stationary. The screw should be screwed all the way into the metal
tube. To then move the plunger down the motor needs to unscrew the screw. I was mystified that this thing even proved it's proof of concept... It does
legitimately slowly move the plunger in and out, though I think the power for this even with a cheap potentiometer(12V DC 100rpm motor, ~12.5V DC
power supply) is a bit too much and perhaps the motor goes too fast.
I like all of these ideas more then this POS I almost threw together. Then again this thing probably could be fine tuned a bit and with some
actual care and less of a "tape solves everything" attitude, it probably could suit it's purpose with some small investments. I'll probably give it a
more honest try now that I see how it could work and of course I will report back with something more presentable and functional.
DJR: nice link! but it seems a bit over-kill, at least the laser cut acrylic part.
Watson fawkes: Once again I have lots of things to read about.
I'll attach a picture but it's title is fitting for what it is. the picture isn't really demonstrative but it provided me with a nice laugh maybe
it'll at least give someone that.
[Edited on 14-12-2012 by smaerd]
|
|
|
Morgan
International Hazard
    
Posts: 1694
Registered: 28-12-2010
Member Is Offline
Mood: No Mood
|
|
For a quirky home-brew, I don't know about how you could hook a motor up, but you can cannibalize an old microscope for fine or coarse feed when you
want to control how much movement you want an object to travel. Maybe even a weight using gravity could drive a slow feed like my diamond saw, or a
pneumatic design. I have a couple of glass syringes I used to piston air back and forth between the two and also to make a simple thermoacoustic heat
engine. They are quite responsive/sensitive so perhaps you could drive one syringe with the other using air pressure, that is use air pressure to push
the piston out of one to actuate the other. Sometimes I used a trocar to link them to things.

|
|
|
Swede
Hazard to Others
  
Posts: 491
Registered: 4-9-2008
Member Is Offline
Mood: No Mood
|
|
While not a syringe pump, one of my most often-used similar devices is an Aalborg brand all-PTFE needle valve. These come equipped with PFA resin
compression fittings for various sized tubes, 1/4" or 6mm being typical.
The fine control of this brand is superb. A gravity-feed drip system, with sufficient head height, will deliver an extremely fine flow. I've dialed
the thing down to a drop every 15 to 30 seconds on occasion.
While not having the precision of a true syringe pump, it is an alternative.
A few years ago, I found a Braintree variable speed syringe pump being sold surplus for maybe $40. Snatched it right up.

Braintree Scientific sells a very simple single-speed syringe pump new for $99. I'm thinking how easy it would be to jailbreak it and install a
variable speed system for the motor, which is undoubtedly a simple DC gear motor.
|
|
|
smaerd
International Hazard
    
Posts: 1262
Registered: 23-1-2010
Member Is Offline
Mood: hmm...
|
|
So I finally got around to building my syringe pump. It's not 100% complete but more like 98%. just need to fix the syringe and fix the piston to the
syringe so I can retract it. The code and electronics are all done though  .
Pretty happy with it. .
Pretty happy with it.
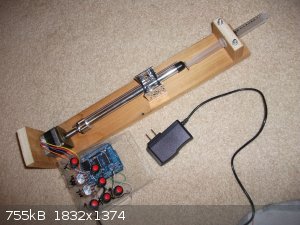
It can "Dispense", "Retract", "Dispense & retract", and it has a cancel button so I can stop any operation at any time. As well as two
potentiometers to control the volume to dispense and set the speed.
[Edited on 17-1-2015 by smaerd]
|
|
|
Zombie
Forum Hillbilly
    
Posts: 1700
Registered: 13-1-2015
Location: Florida PanHandle
Member Is Offline
Mood: I just don't know...
|
|
Have you thought about a clock. A small crystal hooked to a triac to control your motor. Every pulse of the crystal triggers one step of the motor,
and you can not get more precise than this.
I'm sure there are hundreds of ready made timer circuits on Ebay for 3.00 USD/free shipping...
Ok. I was off by 4.50 but it was the first one I found. http://www.ebay.com/itm/Synthrotek-555-Timer-Oscillator-PCB-...
Triac's go for 1 buck...
Ok I over shot by .75.. again, the first one I found.
http://www.ebay.com/itm/10PCS-BTA24-600B-BTA24-TRIAC-600V-25...
Since your unit is built I focused on the controler
They tried to have me "put to sleep" so I came back to return the favor.
Zom.
|
|
|
smaerd
International Hazard
    
Posts: 1262
Registered: 23-1-2010
Member Is Offline
Mood: hmm...
|
|
Nice Zombie I didn't think of that. It would probably be a pain(for me) to create a circuit to drive the bipolar stepper using that circuit though.
That's why I went the laymens way out with the motor driver board. I prefer to work with programming over circuits as it is easier for me to trouble
shoot.
I just used an arduino and a motor control board which uses a L293D IC (dual H-bridge). I'm sure someone unethical could find a clone of the board and
the arduino I used for around 10-15USD. It works fine, I scanned the AFMotor library and it seems pretty sound for what I need the device to do. I did
have to do some very minimal tweaking to allow for interrupting the stepper routine (introduce a volatile boolean, and an if statement). If anyone
wants a write-up for how I have built the device, my circuit, and/or the arduino code let me know. It's all very simple.
edit - my adventures in home built scientific tools has taught me many things. The largest being that many appliances are a motor + a small amount of
mechanics or a resistive heating element and a small amount of mechanics. It's kind of funny really.
[Edited on 17-1-2015 by smaerd]
|
|
|
Zombie
Forum Hillbilly
    
Posts: 1700
Registered: 13-1-2015
Location: Florida PanHandle
Member Is Offline
Mood: I just don't know...
|
|
I applaud your ingenuity, and the fact that you followed a course to reach a goal.
I have found that posting on forums is one of the single best things you can do to help develop an idea, provided you find the Right forum.
I posted up a concept for a Vacuum Pump here, and as certain as you built a working version... so will I.
Again... Kudos!
Just saw your edit...
That is something I am just realizing. Everything that we touch is all based on just a few simple components, and we all have the ability to modify
all of it. Cool Stuff For Sure!
They tried to have me "put to sleep" so I came back to return the favor.
Zom.
|
|
|
Mesa
Hazard to Others
  
Posts: 264
Registered: 2-7-2013
Member Is Offline
Mood: No Mood
|
|
When I had read the OP, I immediately got an idea to use a hamster with one of those exercise wheels and a water-bottle spiked with some narcotic like
the way they do the toxicity and self-administered response studies.
Aimlessly link-hopping Pubmed pharmacology articles does strange things to the brain...
[Edited on 17-1-2015 by Mesa]
|
|
|
Dr.Bob
International Hazard
    
Posts: 2734
Registered: 26-1-2011
Location: USA - NC
Member Is Offline
Mood: No Mood
|
|
Very nice job. I have always wanted to build a small one like that. one advantage of that small size is that you could mount it right over the
flask and not need a long needle, like most syringe pumps require. I'm very impressed. Great photo also.
Did you design it for multiple sized plastic syringes, or just one size for now?
[Edited on 17-1-2015 by Dr.Bob]
|
|
|
smaerd
International Hazard
    
Posts: 1262
Registered: 23-1-2010
Member Is Offline
Mood: hmm...
|
|
Thanks everyone!
Dr. Bob it's actually pretty long in dimension(maybe 18-20"). The nice thing about the design is I can remove the wooden block from the front of the
design by loosening two bolts and place a different block in and put in a larger or smaller syringe then just shift the position of the shaft. It's
not designed exactly for other sizes though because I only had access to a 10mL syringe. Tomorrow I'll tidy things up and this should be done.
The only flaw with this is the L293D chip :/ . It works but it does get quite hot even with the heat sink I hacksawed from an old GPU and thermal
pasted on. So I expect to be replacing it from time to time(if I get 3-4 months out of it I'll be happy its a 2$ chip) until I find a suitable
upgrade.
I built it for microfluidics(lab on a chip) type experiments. Now I just need to finish my other piece of equipment and I will be able to actually
start those works.It would also be nice for addition of reagents over a slow period of time with the wonderful syringe ports I was gifted from you
(@Dr. Bob)  . .
|
|
|
Zombie
Forum Hillbilly
    
Posts: 1700
Registered: 13-1-2015
Location: Florida PanHandle
Member Is Offline
Mood: I just don't know...
|
|
Here ya go Smeard. An entire detailed thread on what I was describing. I'm only posting it because of your post re: heat...
I hope cross posting is allowed...
http://www.sciencemadness.org/talk/viewthread.php?tid=41539
These fellas did one hell of a job for around the cost of a McKy D's dinner. You all have a great comunity here, and I hope I can contribute in some
small way.
They tried to have me "put to sleep" so I came back to return the favor.
Zom.
|
|
|
smaerd
International Hazard
    
Posts: 1262
Registered: 23-1-2010
Member Is Offline
Mood: hmm...
|
|
I'm looking for some DIY advice on how to fix my 'piston' to the tail end of a syringe. If anyone has any suggestions I would appreciate it.
Right now I'm thinking:
Velcro - easy and cheap but would need to be replaced each syringe.
Magnets - easy and cheap but would need to be replaced.
A physical mechanism - ideal but I lack the proper tools to machine one so I would need to design something.
|
|
|
Zombie
Forum Hillbilly
    
Posts: 1700
Registered: 13-1-2015
Location: Florida PanHandle
Member Is Offline
Mood: I just don't know...
|
|
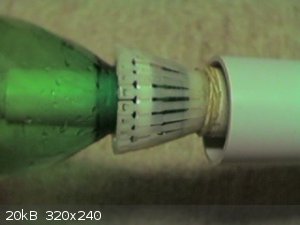
How about a simple press fit "clip" sort of deal.
Cut a couple notches out of the syringes plunger, and adapt a couple "hooks" on your piston.
Something similar to an ejector for a bullet shell in a rifle.
You could easily add clips to the piston w/ zip ties.
Use two or three ties to hang off the piston square end down, and over hanging, and one or two to secure them. Then cut the plunger to fit into
them... Like a water bottle rocket.
Forgot the pict...
[Edited on 19-1-2015 by Zombie]
They tried to have me "put to sleep" so I came back to return the favor.
Zom.
|
|
|
smaerd
International Hazard
    
Posts: 1262
Registered: 23-1-2010
Member Is Offline
Mood: hmm...
|
|
That's an interesting suggestion Zombie. I settled on using neodymium magnets but have an interesting idea for how to accomplish it.
Dr. Bob gifted me a goody bag full of every syringe size imagineable! So now I am aiming towards a universal design. My initial idea, is to create a
sort of "machinist's v block" to hold the syringes. I will first measure the diameters and lengths of each syringe and make a nice excel sheet for
ya'll. Then work out an 'ideal' angle to cut the V, or simply make two or three modular/replaceable V's once I analyze the data. Then get to work on
the magnet idea, then finally update the interface and circuit to accommodate these designs.
I am super grateful for this, and will be posting a full write-up once I make the next few steps. Progress may be a little slow because I am pretty
preoccupied with other engagements right now, but I'll be chipping away at it.
[Edited on 28-1-2015 by smaerd]
|
|
|
Zombie
Forum Hillbilly
    
Posts: 1700
Registered: 13-1-2015
Location: Florida PanHandle
Member Is Offline
Mood: I just don't know...
|
|
Way cool! You have a great community here.
I understand the busy part too. All I think of is what I want to do, and all I do is work towards those goals.
When's the fun part start?
I like the machinists block idea. Can't wait to see what you come up with.
They tried to have me "put to sleep" so I came back to return the favor.
Zom.
|
|
|
smaerd
International Hazard
    
Posts: 1262
Registered: 23-1-2010
Member Is Offline
Mood: hmm...
|
|
So I finally got around to measuring the syringes Dr. Bob Gifted me.
I made a little spread-sheet containing the data. If anyone else has any syringes laying around and a caliper feel free to add too it. The more
manufacturer's and sizes the better. Especially for designing the syringe "carriage"/holder thing.
The measurements were taken around the diameter of the barrel, and then the length of the farthest graduation to the first or "Throw".
I am realizing there's no way to avoid an LCD screen for the final version so the user can select preset syringes, and update the list via
computer/USB. I'll have to think about how I'll go about that but I think I can line it up very easily in my analog interface. For the proto-type I
will likely just talk to the arduino via USB. I probably won't have time to get to that or the v-block for a little while though. Really bogged down
with course-work and research.
Although the magnet idea may come sooner than those revisions because I need a nice big neodymium magnet for a future research project.
Attachment: Syringe Database.xls (7kB)
This file has been downloaded 822 times
[Edited on 10-2-2015 by smaerd]
|
|
|
smaerd
International Hazard
    
Posts: 1262
Registered: 23-1-2010
Member Is Offline
Mood: hmm...
|
|
I still haven't worked out the V-block thing, but I realized I completely forgot to share the code and circuit diagram I was using for this project.
The arduino code is incredibly simple, the only minorly tricky thing I did was implemented a way to interrupt a dispense/retract routine by slightly
altering the AFMotor library. So I'll upload those altered files as well.
Attachment: syringepump.ino (2kB)
This file has been downloaded 997 times
Attachment: AFMotor.zip (10kB)
This file has been downloaded 729 times
Also the way I decided on doing the user interface was purely analog. I basically did a 7-way voltage divider really simple circuit. So here's a
schematic for that.
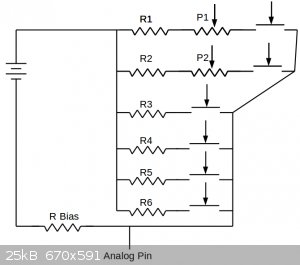
So again once I figure out a way to physically accommodate other syringes cheaply I will let you all know. I still haven't though, so no changes. But
I figured it's important to share the code incase someone else reads this thread with a similar interest.
[Edited on 13-6-2015 by smaerd]
it doesn't look like I implemented real world speed yet, so I'll have to do that eventually.
[Edited on 13-6-2015 by smaerd]
|
|
|
Frankenshtein
Harmless

Posts: 25
Registered: 20-11-2018
Location: ahead
Member Is Offline
Mood: oligomerized
|
|
Arduino with "servomotors" might work, as long as the servomotors are strong enough. They can be very cheap, likely much cheaper and simpler than a
stepper motor. There are also likely easy and cheap tutorials out there for controlling such remotely, which could be a big plus with dangerous
reactions.
[Edited on 19-9-2020 by Frankenshtein]
|
|
|
mayko
International Hazard
    
Posts: 1218
Registered: 17-1-2013
Location: Carrboro, NC
Member Is Offline
Mood: anomalous (Euclid class)
|
|
The Poseidon syringe pump system was developed while this thread was sleeping:
https://www.sciencemadness.org/whisper/viewthread.php?tid=61...
al-khemie is not a terrorist organization
"Chemicals, chemicals... I need chemicals!" - George Hayduke
"Wubbalubba dub-dub!" - Rick Sanchez
|
|
|