Sciencemadness Discussion Board

Making Pinchbeck Brass

MrHomeScientist - 8-4-2018 at 17:02

Not so much chemistry as metallurgy, but I thought people might be interested anyway. I tried making some brass this afternoon by alloying copper and zinc in my furnace. My goal is to make a brass that looks very similar to gold, for use in another project. Obviously I could just go buy some brass fittings, but I thought it would be fun and educational to try making it instead.

Researching brass alloy colors led me to Pinchbeck, an alloy designed to resemble gold (some neat history on it in that link). It has a copper:zinc ratio of either 89:11 or 93:7.

One of the difficulties in making brass is that zinc's boiling point (907 C) is actually lower than copper's melting point (1084 C). So the way to make this alloy (and many others, from what I've read) is to melt the highest-melting component first, then add in the other components in descending order of melting point. With zinc you get a "flare-up" and a lot of it boils off, so you hope that most of it dissolves in the melt first. This article at Scientific American has some good info too.

I started with 113.43g Cu and 14.0g Zn to go for the 89% copper ratio, assuming that some zinc would boil off and drive it closer to the 93% ratio.

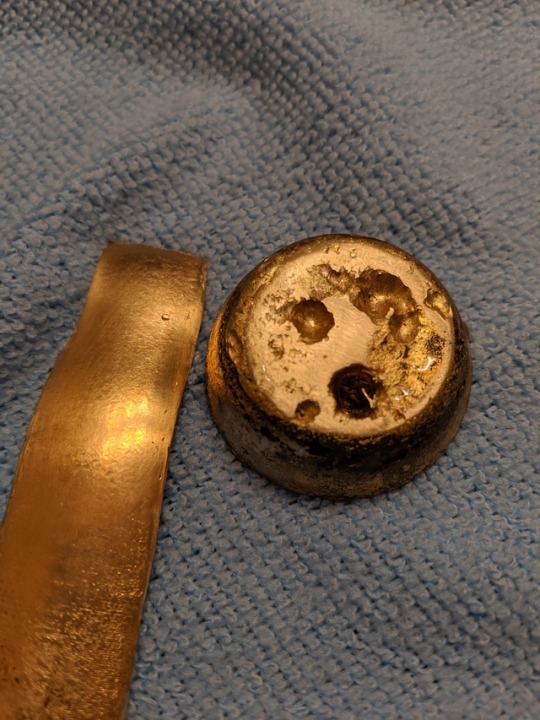
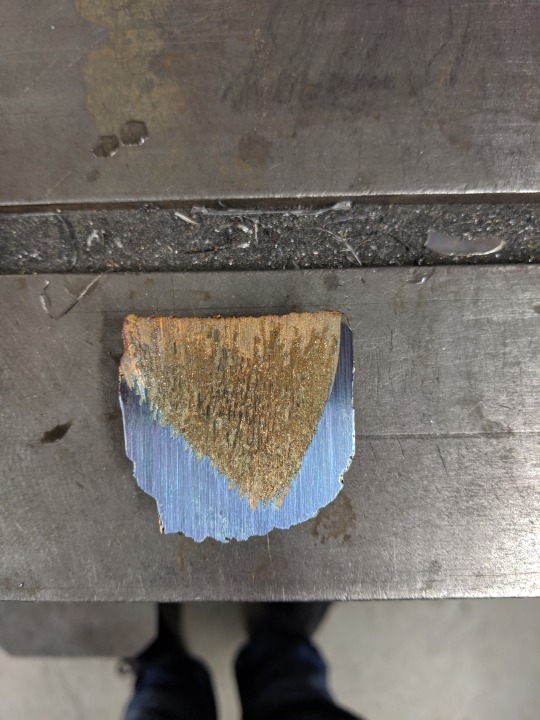
brass 1.jpg - 1009kB

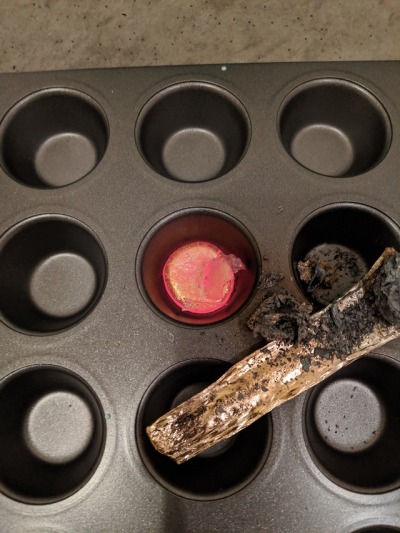
I also read a bit about brass fluxing; there's a nice chapter on it here. I tried sprinkling some crushed charcoal over the copper prior to melting. I'm not sure if it did anything though; I'm thinking I probably should have done that after it was melted.

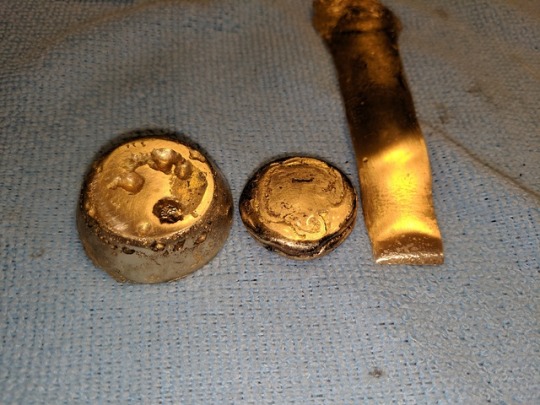
brass 2.jpg - 1.5MB

Side note about safety: vaporized zinc is not great to breathe. NIOSH recommends an N95 particulate filter for zinc oxide fumes. I wore one of those in addition to all my heat safety gear.

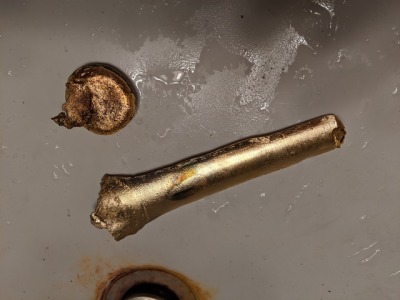
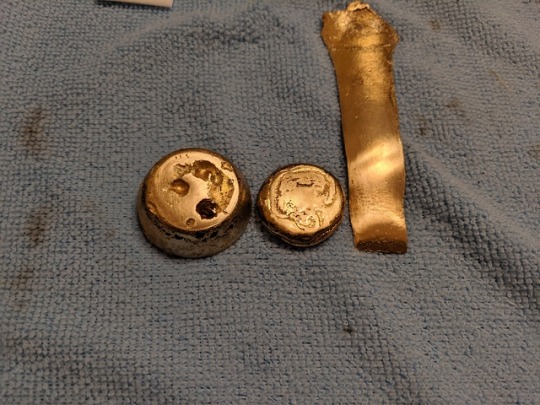
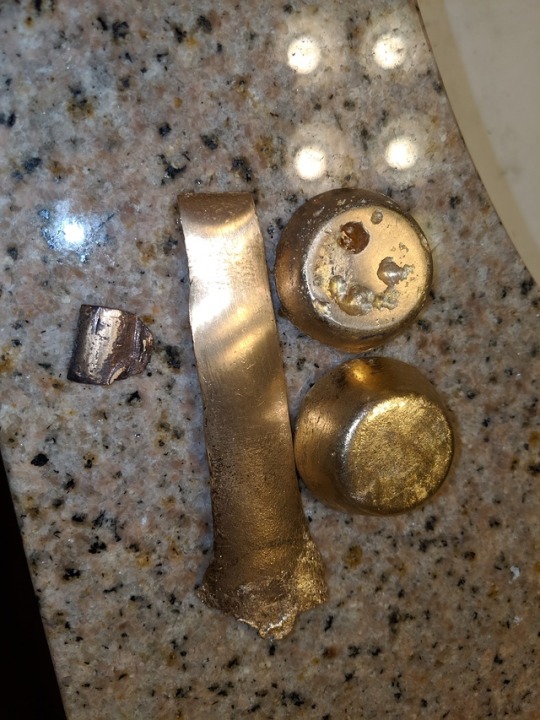
Anyways, I heated the copper until molten and then dropped the piece of zinc on to the melt. Being less dense, it floated on top and less than a second later I had a flare of green fire and quite a lot of white smoke. I was glad to have the respirator. I went upwind and let it heat for another few minutes, then poured it into my steel muffin tray mold. As it turns out, this was not a great choice of mold. In one spot, the brass fused to the steel and it took a hell of a lot of effort and the destruction of that one muffin cup to pry it out of there. After I wrenched it free, I wire brushed the surface a bit to see the color.

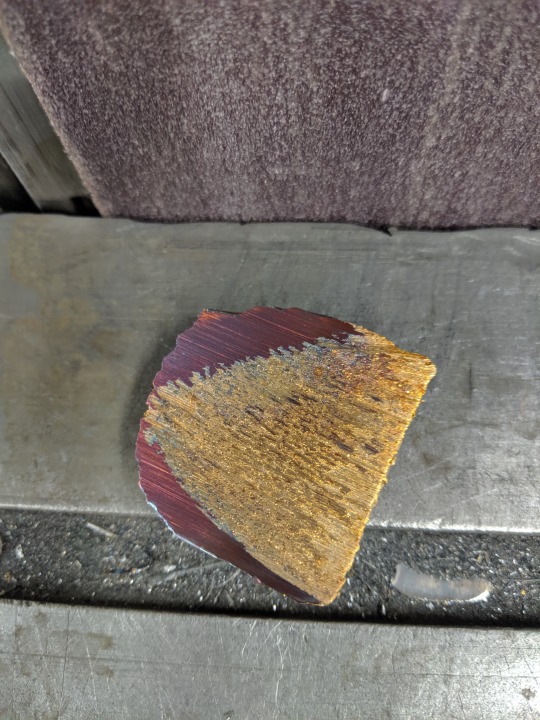
brass 3.jpg - 1.2MB

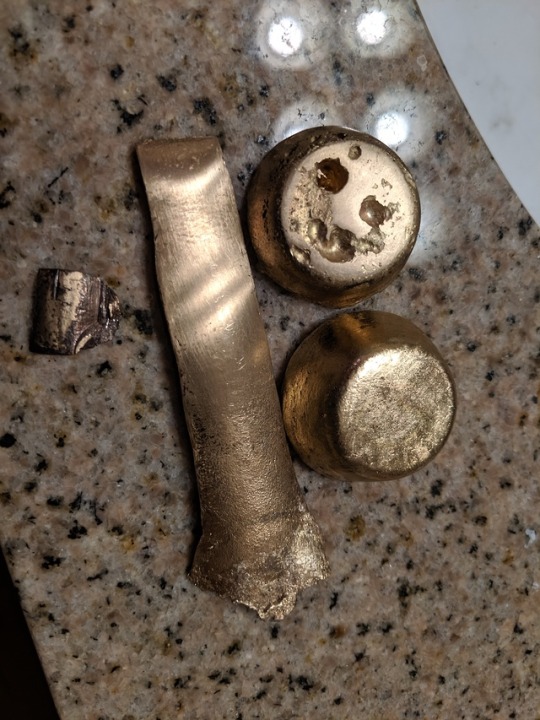
Here's the brass compared to wire brushed pure copper for comparison:

brass 4.jpg - 1.3MB

As you can see, it's much more red than it should be. That's certainly due to a lot more zinc boiling off than I expected. Getting there though!

Next step will be to remelt this ingot and add another piece of zinc. This time I'll try sprinkling the charcoal over the molten alloy rather than at the beginning. I'm not sure if it would be a good idea to try pushing the zinc under the copper's surface to encourage absorption - it might just boil and throw molten copper around. The Scientific American link recommends pre-heating the second metal, although that might be more trouble than it's worth since the zinc would be molten to even come close to copper temperatures.

elementcollector1 - 8-4-2018 at 18:17

From what I've seen, an alloy most closely resembling 23K gold (and used for that purpose as faux gold leaf) is 85% copper, 15% zinc.

I can also safely inform you that melting the zinc and dropping the copper in doesn't work very well either - the zinc either combusts anyway, or the whole thing solidifies into a half-brass, half-component brick. I've often wondered about what fluxes might help keep things from burning at the higher temperatures of molten copper, but haven't looked into it too thoroughly.

I do remember that when melting lead-tin alloys for a phase diagram lab back in university, we used quite a bit of graphite powder as a flux, filling up nearly half the crucible as compared to the lead-tin barely filling the bottom. The lead-tin came out very shiny and silver after polishing - no oxidation whatsoever.

Fulmen - 8-4-2018 at 23:40

I don't see why adding Cu to Zn shouldn't work. You would add the Cu in small portions, allowing it to dissolve as you gradually increase the temperature. I'm guessing that the reason it's not done this way in the industry is that it would take more time. They also have the advantage of chemical analysis to dial in the composition. The other downside to working slow would be increased time for oxidation, so it's not clear if it would save more Zn unless a shielding is employed.

As for shielding I would try either carbon or perhaps boric acid?

bobm4360 - 9-4-2018 at 12:32

Use borax as a flux. It concentrates the oxides into dross floating on the melt, and protects the melt from further oxidation.

MrHomeScientist - 9-4-2018 at 12:42

When should the flux be added? Before or after melting? How much flux per melt? I assume it needs to be anhydrous borax, not the off-the-shelf decahydrate? I have little experience with this.

I didn't have any noticeable oxides for this particular melt, so a cover flux might be more appropriate than a drossing flux in this case (if I understand all that correctly).

Quote: Originally posted by Fulmen  
I don't see why adding Cu to Zn shouldn't work. You would add the Cu in small portions, allowing it to dissolve as you gradually increase the temperature.

But brass' melting point is still quite a ways above zinc's boiling point, and below copper's melting point. I just don't see how that would work, since the copper wouldn't melt. Plus if brass did form I imagine it would solidify at those temperatures. Unless copper has a high solubility in zinc. This information has to be around somewhere; brass has certainly been around long enough.

aga - 9-4-2018 at 12:59

When to add flux is a very contentious issue, which means that nobody knows for sure.

Add some before, during or after the melt, or two of those, or all three.

A few experiments and you'll know which works best.

Unfortunately the purity of your metals and the flux won't make it an inarguable set of experimental data.

Fulmen - 9-4-2018 at 13:40

I would expect copper to be soluble in molten zinc, at least when it's getting closer to the boiling point. As the copper dissolves the melting point increases, so you would have to gradually ramp the heat as you add more copper.

As to when you should add the flux IDK, but I would use some from the start. Borax (sodium tetraborate, not the same as boric acid) could also work, I expect the water would be driven off before the zinc melts.

elementcollector1 - 9-4-2018 at 16:22

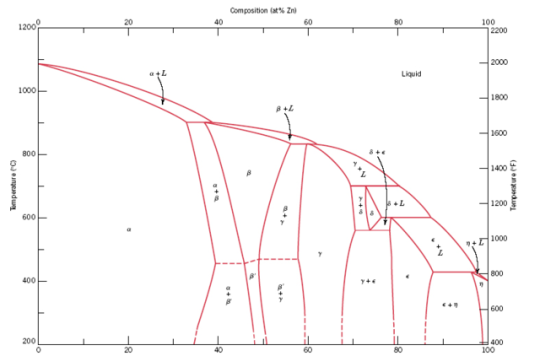
We can get an idea of how soluble the different metals are from the phase diagram. Thankfully, the Cu-Zn phase diagram is one of the best-studied ones, so it's easy to find:


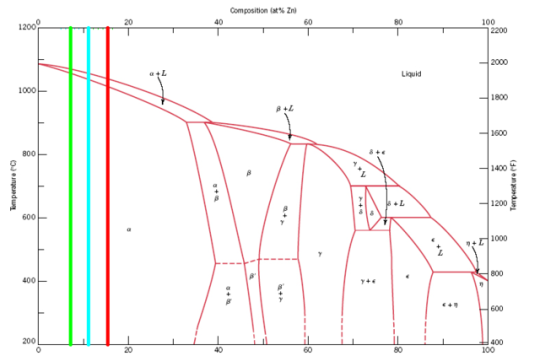
On the right is pure, 100% Zn, on the left is 0% Zn (or 100% Cu), and in the middle we have various solid and liquid phases. The two Pinchbeck brass alloys fall right about here (in cyan and green, respectively, and the red line is the 85% alloy I suggested earlier):


Visually, the green line would appear to be the 'reddest' alloy, probably close to what MrHomeScientist's final product was if not even closer to copper's appearance. The red line, on the other hand, would result in a much richer 'yellow' appearance, and the cyan would be somewhere in between. Pinchbeck brasses are made to most closely resemble 18K gold (the most popular alloy of gold used in jewelry at the time of invention), whereas the stuff I found is made to resemble 23K gold.

The only major chemical difference between these three alloys is the gap between them being in the completely liquid L phase and the completely solid α phase. At this end of the phase diagram, you can see that zinc is very soluble in molten copper, judging from the massive α phase space that takes up most of the left half. But, looking at the right half, you can also see that copper is comparatively not very soluble at all in molten zinc - just a tiny little sliver of a η phase.

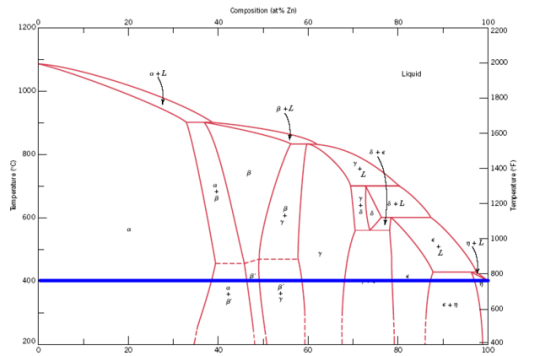
Were you to hold the whole thing at about the melting point of zinc (420 degrees C, rounded slightly for convenience) to avoid boiling, and add solid copper, the phase composition would move in a horizontal line leftwards like so:


As you can see, what little copper that would manage to dissolve in the molten zinc would immediately solidify it into the η phase, and none would diffuse much further due to the contents of your crucible now being a solid block. To avoid this, and keep everything liquid even after the copper and zinc had mixed, you'd have to raise the temperature to about the melting point of each alloy in turn, which that far over in the phase diagram is pretty close to the melting point of copper (about 1065, 1050 and 1035 degrees C for the green, cyan and red lines respectively, compared to pure copper's 1085 C). The boiling point of zinc is about 907 C, so this approach just plain doesn't work.

The main sticking point, for me at least when I tried this, was that no matter what I did, the zinc would melt, float on top of the molten copper, and then combust, coating the entire furnace in fluffy, yellow zinc oxide. What zinc did manage to diffuse into the copper created a brass of a very rich golden hue, but I've no idea of the composition, only that it was probably a great deal more copper-rich than 85%. Pure gold actually isn't quite that tint of yellow, but I liked how it turned out regardless.

I would imagine the best possible approach for adding flux would be to start off with a lot and then keep adding it. Borax might work, being a good deal less dense than brass, copper or even zinc at 1.73 g/cc. It would melt, float above the molten metals, and exclude oxygen by forming a liquid barrier that oxygen would take a while to diffuse through. We used graphite in my lab in more of a 'sacrificial' nature, where any oxygen that did permeate the solid powder would react at the elevated temperatures to form minute amounts of gaseous carbon dioxide or monoxide.

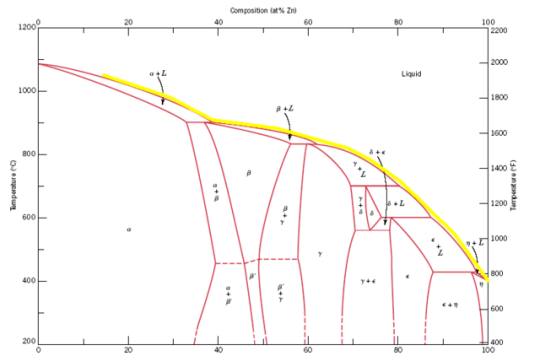
You could, in theory, add copper to zinc and ramp the temperature up so that everything stayed just barely liquid, following the liquidus curve like this:


It would take some pretty good furnace heating controls to do so, though, probably a PID algorithm at the very least. Overshoot or heat too fast, and you might find your zinc or zinc-rich brass boiling anyway.

[Edited on 4/10/2018 by elementcollector1]

bobm4360 - 9-4-2018 at 19:52

As to borax, the OTC "20 Mule Team" works fine. It's a good flux for most Cu-based alloys, just skim yor melt before you pour.

OldNubbins - 9-4-2018 at 20:11

If you are concerned about when to add zinc, this is my experience:

I have a soldering iron I do not take care of. The iron plating over the copper core wore away and zinc/tin in the solder steadily dissolved the copper core. So it seems the copper will dissolve into zinc far before it's melt point.

Also, I was attempting to melt some copper scrap but the gas regulator was fixed and did not put out enough pressure so the furnace would not get hot enough. I threw a handful of zinc pennies into the crucible and the entire lot melted within 30 seconds.

Fulmen - 9-4-2018 at 22:34

Elementcollector: I think you're exaggerating the problem. All one really has to do is to keep adding Cu to the Zn while heating. If too much is added the alloy would solidify, if so just wait until it melts again and continue. Even a small amount of Cu should raise the alloys boiling point significantly, so temperature control should become less critical with time.

elementcollector1 - 9-4-2018 at 23:03

Maybe so - it depends on how quickly the copper dissolves into the molten zinc. I couldn't find the boiling points of any brass alloys, and I would imagine the relationship between copper content and boiling point isn't linear, so I don't know whether the small amount of copper that would dissolve in the beginning would be enough to pull the boiling point out of range.

Fulmen - 9-4-2018 at 23:18

Even if Raoult's law doesn't apply it should serve as a reasonable guideline. At 600°C you should be able to dissolve 10m% Cu, and 30m% at 800°C. Considering the boiling point of Cu that should raise the alloys vapor pressure considerably. Combined with a flux that should be enough to prevent excessive loss due to boiling.
I know it's all theory, but I think it looks promising.

Fleaker - 11-4-2018 at 03:19

I always added the Zn to the Cu when the Cu was molten, then poured it.

MrHomeScientist - 12-4-2018 at 09:30

EC1, that's really great information! Thanks for taking the time to post all that. That supports my intuition nicely :D I didn't realize Pinchbeck was made to resemble 18K; that's good to know.

WRT fluxes, it sounds like people here don't have much experience with them. Or there's just so much info and so many conflicting ways to do it that it might not matter all that much. I suppose it's time to experiment, then!

unionised - 12-4-2018 at 11:02

You can make toffee by
melting sugar (well above 100C) and adding water or
heating water sugar together.
As far as I know, confectioners only choose one of those options.

I'd need a good reason before I chose to make brass by the analogy of the "adding water to molten sugar" process.

MrHomeScientist - 12-4-2018 at 12:55

From the SA article I linked:
Quote:
First, melt the least fusible of the metals (that requiring the highest temperature) of which the alloy is to be composed, and after it is fused, keep up the heat until the metal acquires such a temperature as will bear the introduction of the other metals without instantaneous and sensible cooling. After this, introduce the other metals in the order of their infusibility the most difficult to melt first. Whatever may be the proportions of the metals, it is indispensable to melt the most refractory first, and especially when it is to be the principal base, such as copper in all [brasses].

I ran across the same advice in a few other sources, too. It's not a great idea for toffee, but apparently it's the way to go for metals.

happyfooddance - 12-4-2018 at 13:06

Quote: Originally posted by unionised  
You can make toffee by
melting sugar (well above 100C) and adding water or
heating water sugar together.
As far as I know, confectioners only choose one of those options.

I'd need a good reason before I chose to make brass by the analogy of the "adding water to molten sugar" process.


No, you need some proteins to make toffee, what you are describing sounds like "caramel".

IME one uses a bit of roux or straight butter to make toffee. It doesn't take much, and you are correct that the process is very similar to making caramel.

[Edited on 4-12-2018 by happyfooddance]

Fulmen - 13-4-2018 at 01:50

I'm not one to dismiss practical knowledge out of hand, but I still would like to know why. I can imagine many good reasons for doing this large scale where the goal is to speed up the process and minimize oxidation when little or no flux is employed. It doesn't automatically follow that it will be the best method when working in small batches.

Fleaker - 13-4-2018 at 07:41

Borax glass is usually used as a cover flux for cuprous, gold, silver alloys.

The borax stops a lot of the zinc fume.

MrHomeScientist - 13-4-2018 at 12:19

Is the borax added before or after melting? Before adding zinc? Should it be dehydrated first or just throw in OTC borax? Trying to nail down the procedure before I try it this weekend.

elementcollector1 - 13-4-2018 at 12:34

'Borax glass', from what I can find, refers to the anhydrous salt, which is typically dehydrated by melting. The anhydrous, vitreous version melts at around 878 degrees C.

From what little I could find, the important thing is that the borax coats the surfaces of whatever metals you're attempting to melt. I'd imagine that putting enough in to leave no free air gaps in the crucible (but not enough to increase the thermal mass dramatically) would be optimal.

EDIT: More than a few websites are saying to use the borax sparingly, as it doesn't take much to create a protective barrier. Not sure what this would mean for any uncovered metal that oxidizes prior to melting, but presumably the borax would at the very least segregate that from the metal itself.

Also, I've been thinking about making brasses like this from pennies, mainly to get rid of a bunch of scrap pennies I have lying around. Lacking a proper furnace at the moment, but I can do the calculations for the ratio of copper pennies to zinc pennies to get each alloy listed, within about a 0.1% error. Good for people who don't want to go to the trouble of getting pure copper and zinc for precise alloys.

Pinchbeck 1 (89% Cu, 11% Zn): 29 copper pennies : 2 zinc pennies
Pinchbeck 2 (93% Cu, 7% Zn): 45 copper pennies : 1 zinc pennies
Faux 23K (85% Cu, 15% Zn): 25 copper pennies : 3 zinc pennies


[Edited on 4/14/2018 by elementcollector1]

VSEPR_VOID - 13-4-2018 at 21:01

You should create an entry for pinchbeck brass on the List of Chemicals and Materials Made by Sciencemadness.org Users: https://docs.google.com/document/d/1AoI2VA5L4bmFw2HwXS2OVYTV...


elementcollector1 - 14-4-2018 at 18:57

Going to try to make "Pinchbeck 1" and the 85/15 alloy tomorrow from a few pennies (scaled-down versions of the ratios above). Hoping that a pinch of borax and a stone surface for melting will allow me to get nice shiny samples so I can post color comparisons to real gold and a few brass coins I found laying around.

...Also hoping my butane microtorch doesn't vaporize the zinc right off the bat. Gentle heating and allowing plenty of time for each copper dissolution should help...

MrHomeScientist - 14-4-2018 at 19:26

Good luck, EC1! Alloying pennies together is a great idea. The consistent masses between pennies should make for easy alloying calculations. And maybe being plated in copper will help keep the zinc from escaping.

===========================================

Today I did some brass experimentation, with good results. Unfortunately I had to cut it short due to running out of propane, but I was able to make 3 different brasses. I recorded some of it, and you can watch that here: https://youtu.be/40W6Pp7MCuY
It's not really a full quality video so I won't be posting it publicly, but hopefully it will help you guys understand what I did.

I started with 300g (well, 299.5g) of cut copper wire. I made several zinc buttons by gently melting with a propane torch and pouring into a round ingot mold. I weighed each one, and wrote the mass in grams on them.

brass 1.jpg - 940kB

I also gave fluxing with borax a try, by adding some 20 Mule Team borax straight from the box directly to the hot crucible. This went much better than I expected - since it's a decahydrate, I was sure I would get a lot of spattering and foaming from the water rapidly boiling off. Instead, it just melted very calmly and easily. Nice! I added some right at the beginning, before the copper had melted, and added a bit more occasionally during the process (see the video).

After the copper was molten, I would add one zinc button, stir with a graphite rod, then pour out a sample ingot. Then I'd return the crucible to the furnace, let it heat up again, add another button, stir, and pour a sample. Here are my composition calculations, starting with 300g copper and assuming all the zinc went into solution. Obviously I had a lot of zinc boil off, so that would lower the percentages. This also doesn't account for the mass of the sample ingots removed, so that would raise the percentages. So the real value is probably +/- a few percent.

data.JPG - 20kB

I made it to 3 sample ingots before my propane ran out. Here are the results, just after cooling and then after grinding and wire brushing:

brass 2.jpg - 1.1MB


brass 3.jpg - 1.1MB
The blob on the left you might recognize as the pure copper from my last post, for reference.
I'm thinking maybe 2 or 3 more zinc additions will get me to my target color. This is tons of fun :cool:

[Edited on 4-15-2018 by MrHomeScientist]

elementcollector1 - 14-4-2018 at 19:38

Is the one to the far right 15%, or 11% zinc? The one next to the pure copper chunk looks rather like clean copper, but with copper-rich brass it gets a bit hard to tell. Also, how long did it take you to melt them with propane?

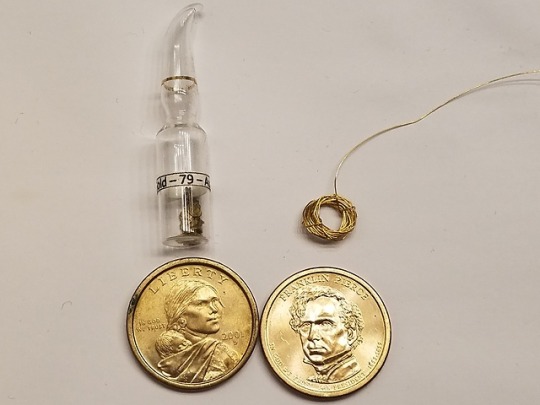
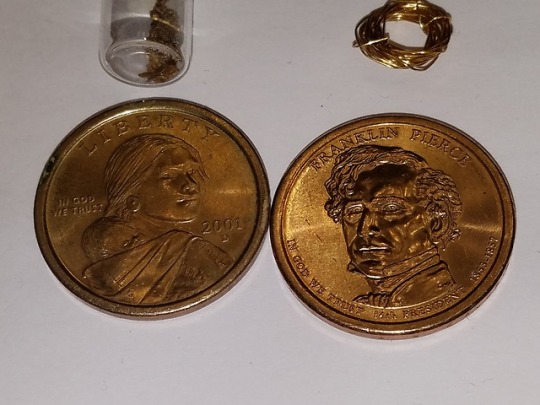
Here's some initial color comparisons I did with brass, natural and purified gold. This was done with and without flash just so you can get a better idea of how they 'look'.


On the top right is a 24K gold wire, coiled so that the color becomes more apparent. Top left is natural placer gold I panned in Angel's Camp, CA. Bottom are both manganese brass (12% Zn, 7% Mn, 4% Ni, 77% Cu), but the one on the right is fresher by a few years.

What's immediately apparent is that, at least with these samples, gold has a noticeably more yellow tint without flash (something an old gold panner taught me is that gold looks roughly the same in any light - bright yellow. Brass and other fakes will take on a green or brown tint).

[Edited on 4/15/2018 by elementcollector1]

[Edited on 4/15/2018 by elementcollector1]

MrHomeScientist - 15-4-2018 at 05:53

I had trouble getting a nice picture of the samples too. It's hard to capture the true colors. In that last picture the rightmost ingot is 15%. It's in order of zinc additions, so pure copper on the left and highest zinc on the right - 0%, 6%, 11%, 15%.

Comparing to gold was a good idea, so I did the same! Mine is a big 'ol nugget from Crisson Gold Mine's "Nugget Bucket" that I panned through a while back. That place is my favorite 'touristy' gold mine, and I've been there several times.

Anyway the first picture is without flash, second is with flash.


brass 4.jpg - 1.1MB

brass 5.jpg - 1.7MB

elementcollector1 - 15-4-2018 at 13:34

Unfortunately, it looks like I'll be taking the Edison approach to this. My butane microtorch provided enough heat to melt the zinc penny, and after a good long while of torching it, enough heat to at least start its dissolution into the copper penny underneath it. Unfortunately, the way things were going, I would have likely had several hours to go before I made any significant progress. I did, however, manage to make the following observations:

-At the temperature of my butane torch, the borax flux slowly (but successfully) fluxed to cover the copper surface. It melted into a black, vitreous glassy substance that had to be chiseled off. The copper surface underneath, despite being from a very old penny, was surprisingly clean - an indication that it was also doing its job of segregating oxides. This doesn't account for the black color, however, as even borax that wasn't touching the copper was turning black when melted.

-Dissolution, as noted earlier, was incredibly slow at these temperatures. The copper penny was only slightly warped when I decided to stop, and nowhere near molten, even though it did glow a dull red. I suspect the temperature was around 600 C - the lower bound for metals glowing cherry-red.

Well, it looks like it's time to make another makeshift furnace. I have a laundromat dryer heating coil, and I can probably construct a quick casing out of carbon foam. Wish me luck!

MrHomeScientist - 15-4-2018 at 14:53

I did some more calculations on my results. It gets a little complicated!

tl;dr - I was aiming for ingots with zinc content of 6%, 11%, and 15%, and my actual results are closer to 6%, 11%, and 17%.

====================

I wanted to get a more accurate measure of the percentages, so I weighed the 3 sample ingots as well as the final disc of solidified brass that fell out of the crucible at the end.
Ingot #1: Starting with 300g Cu, I added the first zinc piece of 20g. Ignoring any boil-off losses, since I didn't observe any flames or sputtering on this one, this yields 6% zinc content. I then poured out the first ingot, which weighed 58.5g.
Ingot #2: This left 261.5g in the crucible. The second zinc piece was 17.4g, which flared up quite a bit when added. Ignoring the boiling losses for now, that would yield 278.9g in the crucible and a zinc content of 13%. The second ingot was poured from this, and weighed 56.4g.
Ingot #3: This left 222.5g in the crucible. The third zinc was 17.2g and this also flared up when added. Again ignoring this for a moment, there should have been 239.7g in the crucible and a 23% zinc content. I poured off the third ingot, weighing in at 79.7g (overpoured a bit!).

Now to estimate boil-off losses. This final ingot pour should have left 160g of material in the crucible. When I recovered this and knocked off the borax slag, it actually weighed 146.9. So 13.1g of material was lost, which I assume to be entirely zinc. Since I did not observe any boiling on addition of the first zinc piece, I decided to split this evenly among ingots 2 and 3. Subtracting that loss from the total zinc content for those ingots yields 11% Zn for Ingot #2, and 17% Zn for Ingot #3.

Math!

elementcollector1 - 15-4-2018 at 15:05

And yet, the 17% still doesn't quite match the color of your gold nugget, which is clearly more yellow. Maybe even more is needed?

DJF90 - 16-4-2018 at 03:26

Maybe you could use digest a sample of each ingot and do some quantitative analysis to get accurate numbers for Cu and Zn content?

MrHomeScientist - 22-4-2018 at 16:14

I finished off the brass series this weekend by adding two new ingots to the collection. Same procedure as before, starting with the final crucible contents from the last series of experiments. This produced two new ingots before I ran out of alloy. Here they are by themselves, then as part of the lineup with the rest of the ingots. From left to right: pure copper, ingots #1-5 in order, and a piece of pure gold below.

brass 6.jpg - 386kB brass 7.jpg - 405kB

It's incredibly hard to get a decent picture of the color. #4 and #5 are very very similar, but #5 is slightly more yellow. It may be the closest to real gold.

One thing I did notice is the first 3 ingots, over the week since I made them, all tarnished somewhat. I wire brushed everything again before taking the above photos so the comparison is fair.

So now the math. First off I need to edit my previous percentages, because I was able to recover 5.6g of brass scraps from the crucible after pouring ingot #3. Factoring that in, that changes the previous ingot's zinc contents to:

Ingot #1 - 6%
Ingot #2 - 12%
Ingot #3 - 20%


For today's run, my starting crucible charge was 152.5g of the final brass that produced ingot #3. To this I added the 16.5g Zn piece, then poured ingot #4 which weighed 85.7g (seriously overpoured that one!). Then I added the 11g Zn piece to the crucible and poured ingot #5 (55.2g). The dregs in the crucible weighed in at 32.4g. Boiling was pretty tame this time, perhaps because of the lower temperature (since brass's melting point is lower than copper's). Theoretical final weight should have been 39.1g, so only about 3.3g boiled off during each zinc addition. Considering all of that, we arrive at:

Ingot #4 - 36%
Ingot #5 - 72%


Something else interesting was that due to ingot #5's high zinc content, it was on fire as I poured it. So even if I hadn't ran out of alloy, I probably would have stopped zinc addition there anyway.

If anyone wants to review my convoluted math, I'll attach my spreadsheet here too.

Attachment: Brass Experiments.xlsx (13kB)
This file has been downloaded 413 times

elementcollector1 - 22-4-2018 at 18:50

Even at 72% Zn, there's a noticeable difference in color... maybe a tertiary element is needed? Tin, or some such? Strange that such a yellow alloy would still be so far off.

When ingot #5 was on fire, did you use any flux?

MrHomeScientist - 22-4-2018 at 19:20

I did; some borax before each zinc addition. Perhaps not enough?

[Edited on 4-23-2018 by MrHomeScientist]

MrHomeScientist - 23-4-2018 at 13:48

I found this neat graphic on this site: http://cascadecoil.com/2014/12/gold-silver-bronze-your-guide...

different-metallics-guide.jpg - 70kB

It's obviously circumstantial, but having the alloys pictured side by side seems to indicate that gold is somewhere between brass and bronze in color. Could be a data point in favor of adding a bit of tin to my brass to adjust the color. The question is, how much?

I haven't read this all the way through yet, but this very long article looks to be full of useful tidbits: http://science-notebook.com/henley/hen-051-075.html

Some interesting excerpts:
Quote:
Leaf Brass. This alloy is also called Dutch gold, or imitation gold leaf. It is made of copper, 77.75 to 84.5 parts; zinc, 15.5 to 22.25. Its color is pale or bright yellow or greenish, according to the proportions of the metals. It has an unusual degree of ductility.

Page 68 has a whole section devoted to imitation gold (emphases mine, to call out each formula):
Quote:
IMITATION GOLD.
I. One hundred parts, by weight, of copper of the purest quality; 14 of zinc or tin; 6 of magnesia; 3/6 of sal ammoniac, limestone, and cream of tartar. The copper is first melted, then the magnesia, sal ammoniac, limestone, and cream of tartar in powder are added separately and gradually. The whole mass is kept stirred for a half hour, the zinc or tin being dropped in piece by piece, the stirring being kept up till they melt. Finally the crucible is covered and the mass is kept in fusion 35 minutes and, the same being removed, the metal is poured into molds, and is then ready for use. The alloy thus made is said to be fine-grained, malleable, takes a high polish, and does not easily oxidize.

II. An invention, patented in Germany, covers a metallic alloy, to take the place of gold, which, even if exposed for some time to the action of ammoniacal and acid vapors, does not oxidize or lose its gold color. It can be rolled and worked Tike gold and has the appearance of genuine gold without containing the slightest admixture of that metal. The alloy consists of copper and antimony in the approximate ratio of 100 to 6, and is produced by adding to molten copper, as soon as it has reached a certain degree of heat, the said percentage of antimony.

When the antimony has likewise melted and entered into intimate union with the copper, some charcoal ashes, magnesium, and lime spar are added to the mass when the latter is still in the crucible.

III. Aluminum Gold. This alloy, called Nuremberg gold, is used for making cheap gold ware, and is excellent for this purpose, as its color is exactly that of pure gold, and does not change in the air.

Articles made of Nuremberg gold need no gilding, and retain their color under the hardest usage; even the fracture of this alloy shows the pure gold color. The composition is usually 90 parts of copper, 2.5 of gold, and 7.5 of aluminum.

IV. Imitation gold, capable of being worked and drawn into wire, consists of 950 parts copper, 45 aluminum, and 2 to 5 of silver.

V. Chrysochalk is similar in composition to Mannheim gold:

I II
Copper 90.5 58.68

Zinc 7.9 40.22

Lead 1.6 1.90


In color it resembles gold, but quickly loses its beauty if exposed to the air, on account of the oxidation of the copper. It can, however, be kept bright for a long time by a coating of colorless varnish, which excludes the air and prevents oxidation. Chrysochalk is used for most of the ordinary imitations of gold. Cheap watch chains and jewelry are manufactured from it, and it is widely used by the manufacturers of imitation bronze ornaments.

Mannheim Gold or Similor. Mannheim gold is composed of copper, zinc, and tin, in proportions about as follows:

I II
Copper 83.7 89.8

Zinc 9.3 9.9

Tin 7.0 0.6

It has a fine yellow color, and was formerly much used in making buttons and pressed articles resembling gold. Later alloys, however, surpass it in color, and it has fallen somewhat into disuse.

One variety of Mannheim gold, so called, contains 1.40 parts of brass (composition 3 Cu 2 1 Zn) to 10 of copper and 0.1 of zinc.


Mosaic Gold. This is an alloy composed with slight deviations of 100 parts of copper and 50 to 55 of zinc. It has a beautiful color, closely resembling that of gold, and is distinguished by a very fine grain, which makes it especially suitable for the manufacture of castings which are afterwards to be gilded. The best method of obtaining a thoroughly homogeneous mixture of the two metals is first to put into the crucible one-half of the zinc to be used, place the cover upon it, and fuse the mixture under a cover of borax at as low a temperature as possible. Have ready the other half of the zinc, cut into small pieces and heated almost to melting, and when the contents of the crucible are liquid throw it in, a small portion at a time, stirring constantly to effect as intimate a mixture of the metals as possible.


Oreiide or Oroide (French Gold). The so-called French gold, when polished, so closely resembles genuine gold in color that it can scarcely be distinguished from it. Besides its beautiful color, it has the valuable properties of being very ductile and tenacious, so that it can easily be stamped into any desired shape; it also takes a high polish. It is frequently used for the manufacture of spoons, forks, etc., but is unsuitable for this purpose on account of the large amount of copper contained in it, rendering it injurious to health. The directions for preparing this alloy vary greatly. The products of some Paris factories show the following composition:

I II III
Copper 90 80.5 86.21

Zinc 10 14.5 31.52

Tin 0.48

Iron 0.24


A special receipt for oreïde is the following:

IV. Melt 100 parts of copper and add, with constant stirring, 6 parts of magnesia, 3.6 of sal ammoniac, 1.8 of lime, and 9 of crude tartar. Stir again thoroughly, and add 17 parts of granulated zinc, and after mixing it with the copper by vigorous stirring keep the alloy liquid for one hour. Then carefully remove the scum and pour off the alloy.

Pinchbeck. This was first manufactured in England. Its dark gold color is the best imitation of gold alloyed with copper. Being very ductile, it can easily be rolled out into thin plates, which can be given any desired shape by stamping. It does not readily oxidize, and thus fulfills all the requirements for making cheap jewelry, which is its principal use.

Copper 88.8 93.6

Zinc 11.2 6.4

After that it goes into alloys that contain actual gold, which I'm not interested in. Even in this quote, Aluminum Gold and the one right underneath it contain precious metals, so I'm ruling those out.

The use of nonmetal ingredients is very interesting. There's no explanation for them; are they fluxes? Something to encourage better alloying?

The description of Oroide was very promising, until I saw the composition. Are they seriously saying a 90:10 Cu:Zn is indistinguishable from gold? (the tin and iron are only in mix III - it didn't copy well) Unless there's an extremely narrow range around 10% where color changes dramatically, then changes right back, I'm calling BS on that one.

MrHomeScientist - 25-4-2018 at 03:58

Another promising option is aluminum bronze, a mixture of about 90% copper and 10% aluminum. There's several videos about making it, but this one has an incredible looking end product. Here's a screen grab for posterity:

Al bronze.JPG - 159kB

Look at that color!

Easy to make and I have the components aplenty. I'll definitely do a test this weekend.

The other creeping concern I'm beginning to have is how castable these various metals are. The coin I'd like to replicate in gold has some pretty fine details, and I don't know how well they'll get picked up. Suppose I just need to try it and see.

Fulmen - 25-4-2018 at 07:21

Aluminium bronze has another benefit, it doesn't tarnish like brass.

MrHomeScientist - 27-4-2018 at 18:58

I posted this topic on a metalcasting forum I found, to tap into their experience. Check it out here: http://www.alloyavenue.com/vb/showthread.php?13638-Making-Br...

MrHomeScientist - 9-5-2018 at 10:10

I've had lots of great input from the Alloy Avenue guys, and lots of criticism of my propane furnace, lol. I'm finding out that it was somewhat poorly designed. But hey, it still melts metal.

Anyway, my quest for a golden alloy has led me to aluminum bronze. Aluminum bronze is an alloy of copper and aluminum, and has a wonderful golden color. It has high hardness and good corrosion and tarnish resistance. As with all alloys there are a range of aluminum bronzes, but I went with the popular YouTube formula of 90% Cu to 10% Al.

I made a post in that thread that I thought I'd copy here for those that are still interested.

===================================

I made some aluminum bronze this evening using copper and aluminum wires for maximum purity, and WOW is it nice!

I weighed out 5.08g of Al wire and 20.36g Cu wire for the alloy. I used my small crucible and mini propane furnace for this one.

Al bronze  1.jpg - 33kB

Here's the furnace setup:

Al bronze 2.jpg - 81kB

It's very nice for small batches. It just barely reaches copper melting temperature. Now that I know more what to look for, I see that this one has coated kaowool (good) but the burner comes in at just about the middle of the furnace (bad).

Anyways I melted everything down, and the ingot was silver when it came out! I then realized I made a stupid math error and had actually made 20% aluminum bronze (dang!), so I remelted this ingot and added in another 25.36g of copper wire to dilute it down to 10% aluminum. This came out looking gorgeous:

Al bronze 3.jpg - 25kB

That's straight out of the mold, without any sanding or polishing. I think I've found my gold simulant!

It's so good, in fact, that one of those pieces in the photo....... is actually REAL GOLD! Can you tell which one?

elementcollector1 - 9-5-2018 at 17:37

Is it, perhaps, the middle one that was in a previous picture of yours? :P

But seriously, wow. Now that is fake gold. The melting point seems to be a bit higher than zinc brass equivalent, but aluminum's a good deal less prone to burning than zinc is.

Is that mini furnace bought, or homemade?

Fulmen - 10-5-2018 at 02:50

Damn! Looks like you nailed it this time.

MrHomeScientist - 10-5-2018 at 10:08

Quote: Originally posted by elementcollector1  
Is it, perhaps, the middle one that was in a previous picture of yours? :P

But seriously, wow. Now that is fake gold. The melting point seems to be a bit higher than zinc brass equivalent, but aluminum's a good deal less prone to burning than zinc is.

Is that mini furnace bought, or homemade?

Damn! I expected cheating by going to the other forum where I revealed it there, but missed possible cheating from this very thread! Yes indeed, it's the one at bottom middle :)

This stuff even has some weight to it, just a little less dense than copper, so it even feels pretty solid. I'm extremely excited about making more of it, and casting it into shapes!

The mini furnace was bought on eBay a while back. It's very nice for small batches and heats up quickly (except for copper; that takes a while to reach). It's fallen off my eBay purchase history, but I might be able to find the seller if there's interest. I think it was called the "mini micro" propane furnace or something like that.

MrHomeScientist - 22-5-2018 at 19:27

I made a video on my alloying exploits: https://www.youtube.com/watch?v=2o_ooiboyok

Part of it is that unlisted video I shared before; I added an aluminum bronze melt to that footage. There are some seriously AWESOME clips from that: mirror-like molten copper that seemed to be bubbling for some reason, and an incredible transition in metal color when it's quenched.

j_sum1 - 22-5-2018 at 21:11

Thanks MHS. I have it bookmarked and am looking forward to watching it.

elementcollector1 - 25-9-2019 at 10:36

Decided to give this a try of my own, with some interesting results...

For starters, I went with a ratio of 90/10 copper from welding electrodes and aluminum from small juice cans respectively. The crucible was filled with argon prior to heating but not refilled at any point afterwards, and some oxygen undoubtedly got in.

As it was melting/pouring, I noticed a slag of aluminum oxide forming from one of the can scraps- I didn't think much of this, as it was my first run. Pouring gave me a small button of liquid, as well as a spout that fell out of the crucible:


Upon quenching, this was what they looked like:


(The button isn't actually that much darker - that's just surface oxidation.)

I thought they looked much whiter in coloration than MrHomeScientist's attempt, so I did some specific gravity analysis on two samples - the cast button, and a sample removed from near the top of the pouring spout. These had an approximate specific gravity of 8.233 and 8.450 respectively, which (assuming pure starting metals) corresponds to roughly 96.2% and 97.4% copper by weight.

This, above all else, baffles me - I'd believe losing that much aluminum, but how is the color still so white when it's that high in copper? The only thing I can think of is that my starting metals had some strongly coloring impurities.

Going to try again with some pre-melted aluminum buttons - hopefully this will reduce surface area and help keep oxidation in check.

[Edited on 9/25/2019 by elementcollector1]

elementcollector1 - 25-9-2019 at 15:58

Run 2, this time with a pre-melted aluminum button and the same copper welding electrodes. Noticeably less smoke evolved during this run, but despite filling the crucible with argon repeatedly, I spotted a blue flame briefly flare up at a few moments. The piece on the left is from Run 1, for comparison (unfortunately, I didn't get a nice, uniform size between these two runs, so color comparison is a little harder).


I'm pretty sure I'm losing copper on these runs, for a few reasons - the first being the aforementioned blue flame, indicating air was reacting with the copper and turning it to oxide. (Though wouldn't this in turn react with the molten aluminum to be reduced back to copper and produce aluminum oxide slag?)

The second is that this is roughly the same color as the previous run, meaning their concentrations are going to be pretty similar (I'll edit this post tomorrow with the numbers). Too white to really compare to MrHomeScientist's runs, despite starting at the same concentration.

The third reason, which is definitely indicative that I lost something, is that the final pour weighs considerably less than the initial starting weight - 90 grams copper, 10 grams aluminum became 83 grams of aluminum bronze.

Is there a flux, or other such thing I should be using? I'm definitely encountering plenty of alumina-based slag, so oxygen is a factor here. I'm concerned because this makes it difficult to accurately mix alloy compositions - should I be overcompensating for copper content?

EDIT: I've since found part of the problem lies in photography - these look beautiful when taken under flash, less so in real life:


Without flash:


EDIT 2: Just got the composition results for the second run!

To my (half)-surprise, this ingot is much lower in copper than the previous attempt, at 92.3% by weight. This is much closer to the original composition, which indicates my suspicion about my aluminum's surface area was correct, and much less was lost this time. Despite losing more copper by weight (13.33g as opposed to 3.60g Al lost), this alloy is still enriched in copper from the starting concentration of 90%.

Surprisingly, the ingot with lower copper content takes on a yellower tinge. I'd thought that copper-rich aluminum bronze would shift towards orange, but it appears to be making a quick stop at a paler white gold at around 96-97 wt% copper first, at least upon polishing.

Next runs will focus more on purity of starting metals, to see if this makes a difference in color. In addition, I think I'll turn down the melting temperature from 1100 C, as while this ensures everything is liquid, it might also be responsible for losing copper as vapor.

[Edited on 9/26/2019 by elementcollector1]

Sulaiman - 25-9-2019 at 23:03

Quote: Originally posted by MrHomeScientist  
I made a video on my alloying exploits: https://www.youtube.com/watch?v=2o_ooiboyok


I found this thread, your video and the thread on the other forum interesting.

One question (my idle curiosity); have you tried sawing through the ingots to check if the colour is truly the alloy colour, or an oxide/surface coating ?

Anecdotal: somewhere around 1971 I was on an induction/recruitment course at GKN which was at the time (they said) the world's largest producer of brass screws.
I spent about a week in the factory, there the foundry melted scrap brass, copper and other metals to make the brass for their screws.
Despite their years of experience they could not predict the final composition of their brass alloys,
they would take a small ladle of the melt as a sample and send the resulting ingot to the lab,
in the lab they used a spark spectograph machine to assay the ingot,
then telephone down to the foundry what metals in what quantities to add to the melt before pouring.
So based on the above alone, I doubt that any of your alloy compositions are exact.
I have no matalurgy/foundry/casting experience myself.

Nice to see how quickly your foundry skills have progressed.

elementcollector1 - 26-9-2019 at 18:45

Quote: Originally posted by Sulaiman  


One question (my idle curiosity); have you tried sawing through the ingots to check if the colour is truly the alloy colour, or an oxide/surface coating ?


I've broken a couple of my pieces for density calculations, and I can definitely say that the color goes all the way through and is uniform.

However, having rewatched the video again, I find myself very curious at the color change induced by quenching. I haven't done that, preferring to let them air-cool, so I wonder if this is responsible for the color discrepancy in my samples - and if so, how? If it's an oxide layer it would be removed by polishing, yet it clearly isn't in the same video. But you can clearly see the quench takes it from a paler gold similar to mine to a very rich yellow-gold.

Quote: Originally posted by Sulaiman  


Anecdotal: somewhere around 1971 I was on an induction/recruitment course at GKN which was at the time (they said) the world's largest producer of brass screws.
I spent about a week in the factory, there the foundry melted scrap brass, copper and other metals to make the brass for their screws.
Despite their years of experience they could not predict the final composition of their brass alloys,
they would take a small ladle of the melt as a sample and send the resulting ingot to the lab,
in the lab they used a spark spectograph machine to assay the ingot,
then telephone down to the foundry what metals in what quantities to add to the melt before pouring.
So based on the above alone, I doubt that any of your alloy compositions are exact.
I have no matalurgy/foundry/casting experience myself.

Nice to see how quickly your foundry skills have progressed.


Huh. Well, at least I'm not alone in wondering how to keep things more constant. I wonder how exact their composition needed to be for screws?

Fulmen - 26-9-2019 at 22:08

For commercial production you need to know the exact composition. Even if your tolerances are loose you still need to know for sure.

Sadly this is where most amateur projects hit a dead end. Even simple projects quickly devolve into a multi-discipline challenge from hell.

Sulaiman - 27-9-2019 at 00:05

Quote: Originally posted by elementcollector1  
...However, having rewatched the video again, I find myself very curious at the color change induced by quenching. I haven't done that, preferring to let them air-cool, so I wonder if this is responsible for the color discrepancy in my samples - and if so, how?...

All I know is that quenching can 'lock' a crystal structure that normally only exists at high temperature,
so looking at the phase diagram presented earlier - I guess you will have to try quenching.

regarding actual composition and the post above,
just buy one of these :D https://www.google.com/search?q=handheld+xrf&safe=active...
PirateDocBrown - 27-9-2019 at 23:03

I'd suggest another source for brass stock, spent cartridge cases from a firing range. Many times, they can be had for free, if you do the labor of collecting them.

Most typically, they are 70 Cu, 30 Zn.

Fulmen - 27-9-2019 at 23:53

Quote: Originally posted by Sulaiman  
quenching can 'lock' a crystal structure

True, but looking at the phase diagram I can't see any signs of that for these alloys. The beta phase isn't present until you go above 30% Zn.

elementcollector1 - 28-9-2019 at 07:25

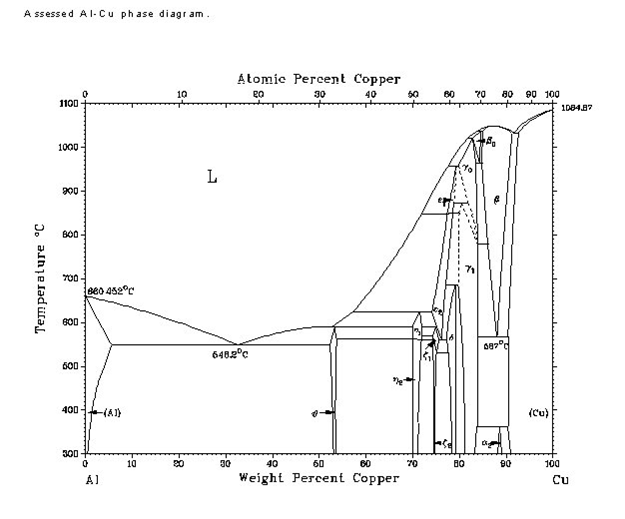
We've since moved on to aluminum bronze, so the Cu/Zn phase diagram isn't exactly helpful anymore. Here's the Cu/Al phase diagram:


The typical composition of aluminum bronze, at 90% Cu, lies near the edge of the wedge-shaped beta phase near the far right. However, it looks like there are quite a few phase changes during cooling to room temperature, the most interesting of which looks to be a mixture of beta and solid solution of Cu, as well as an alpha-2 phase near the bottom at around 300-400 degrees Celsius. So, if I had to take a wild guess on what's going on, it'd be this:

Quenching right after solidification locks the structure in the beta phase, or possibly a mix of beta and solid-solution copper. This might be responsible for the color - hard to say.

Cooling to room temperature more slowly, however, gives time enough for grains of alpha-2 to form (I'm extremely rusty on my metallurgical phase crystal growth lessons, so I'm not really sure what's going on beyond this). This would presumably affect the paler color I've seen in my attempts.

MrHomeScientist - 30-9-2019 at 06:21

Glad to see more discussion on this! I haven't done any metalcasting in a long time, because it's so ungodly hot outside here.

EC1, those do look a bit coppery to me. Still beautiful metal, though! I know all about how hard it is to get accurate pictures of the colors. I have no idea where the weight loss came from; that's surprising. Copper alloys usually use charcoal dust as a cover, to help prevent oxidation. I tried it once but didn't notice much. I may not have used enough. I suspect purity of starting metals affects color a great deal. My initial pours from the bronze look great, but seem to get progressively more tarnished-looking as I remelt and repour the same metal. I tried using copper and aluminum electrical wire for highest purity.

Sulaiman, thanks for the support! RE: your anecdote, the reason brass alloys are so troublesome is the fact that the zinc vaporizes so easily. I saw that in my initial experiments, when the zinc caught fire every time I added a piece. Even melting scrap brass is difficult, because it's constantly losing zinc while molten. That's why it's almost impossible to know the exact composition, even for the experts! So for brass you generally want to melt and pour as fast as possible. I imagine you could limit this with inert atmosphere or a lot of cover flux.

elementcollector1 - 10-10-2019 at 13:41

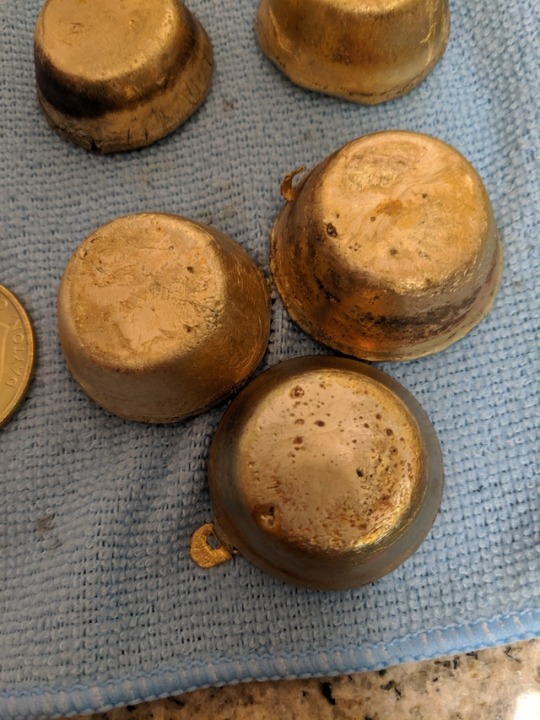
Latest attempt on the bottom right - pure aluminum hobby wire and the usual copper scrap. Took a different approach this time - waited for the furnace to get completely up to temp, put copper in with a little borax, stirred after it melted (no dross!), and dropped and stirred the aluminum in. I also noticed it heat up when the aluminum was added - definitely an exothermic reaction happening there!

I did quench this in water this time, but it doesn't seem to have affected the color much...

Not much difference in the color (it maybe looks a shade yellower in person than the rest), still too pale for my liking.


This could mean two things: One, that the change in purity of the aluminum doesn't have any effect on the overall color (this would be confirmed by repeating with copper electrical wire). Or two, that the crafting wire wasn't actually pure (unlikely, as it has to be more flexible for crafting purposes). This might also indicate that an impurity in the copper is the actual problem.

Density results pending, but I'm expecting it to be something close to 90.3% copper. I'm also going to try making 95/5 with my current stock to see how that impacts things.

I'm tempted to wonder if I'm just being picky at this point - it's always going to look pale under certain lighting, and I could spend years getting closer and closer to that 'real' gold look.

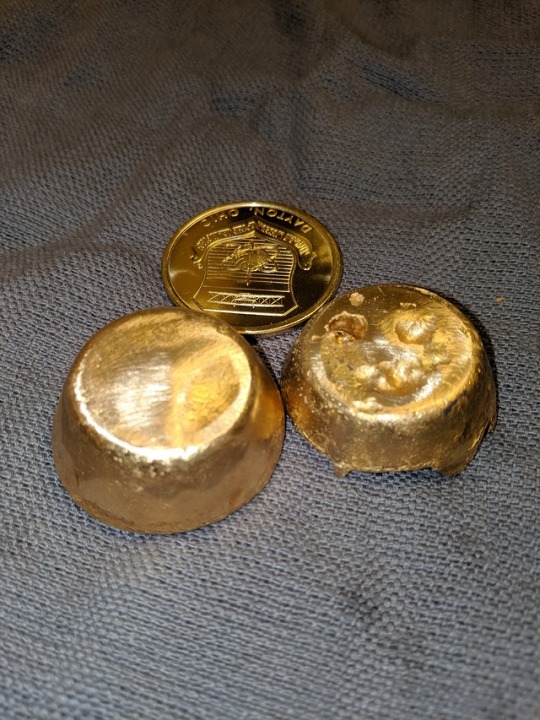
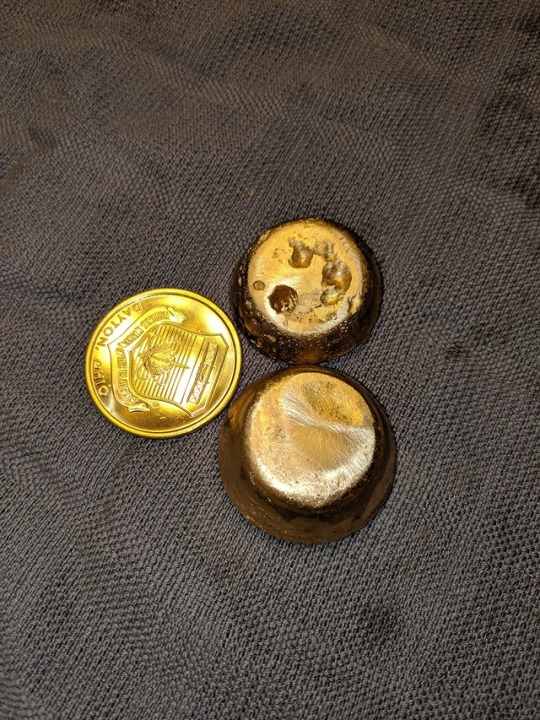
EDIT: I think I might actually just be being picky - rewatching MrHomeScientist's video comparison, I note that the difference between the 'impure' run that quenched to a richer color and the one that used more pure copper and aluminum looks very similar to the difference I can spot between my two samples. I'm still going to try the tests outlined above, but it's entirely possible it's just the lighting that's throwing me off... Here's some more pictures with better lighting contrast (and a brass coin for comparison):


EDIT: Density results are in! This one is about 92.43% copper assuming no other contaminants - this is up quite a bit from the starting concentration of 90.47%. This would indicate that I'm losing more aluminum to evaporation or burning than copper proportionally.

[Edited on 10/11/2019 by elementcollector1]

Junk_Enginerd - 20-10-2019 at 02:52

I started reading this thread just now, and was about to recommend that you attempt aluminum bronze to alleviate the vaporization issues...

I've done a lot of experimenting with copper alloys myself, and I've made both brasses and bronzes.

My experience is that, relative to each other, aluminum bronze is silvery, brass is very yellow, tin bronze goes more toward red and lead will predictably make it darker and duller.

If you think the aluminum bronze isn't yellow enough, perhaps combining both zinc and aluminum might get you there?

As for minimizing losses, a lid on the crucible always helps. Coal will absorb any oxygen, and borax will act as both a physical liquid barrier on top of the melt as well as a flux by combining with slag.

Personally I never use any flux and it works out fine anyway.

MrHomeScientist - 4-11-2019 at 14:53

elementcollector1 sent me some of his bronze samples for color comparison to mine, and here are the results.

The top two photos are under lab fluorescent lights, and the bottom two are under kitchen LED lighting. The pictures on the left are the "as-cast" surfaces, just as they are after pouring. In the right pictures, I sanded the bottom of each ingot with 220 and then 440 grit sandpaper to give the 'true' color.

bronze 1.jpg - 790kB bronze 2.jpg - 766kB bronze 3.jpg - 831kB bronze 4.jpg - 810kB

A-D were the samples EC1 sent, and 1-5 are my own:
Sample 1 & 2: Cast ingots made from soda can Al and Cu wire.
Sample 3: The sample I made on the previous page of this thread, using Al wire and Cu wire (so, very pure).
Sample 4: Actual gold nugget.
Sample 5: A leftover piece from casting, which was sawn off to expose fresh metal but not sanded.

There's also a pair of gold-plated earrings, to compare against shiny gold as opposed to the rough nugget. I don't know what karat they are, though.

It's extremely difficult to see the real color of these things with just pictures, but I hope that gives you some interesting data.

One of my observations, which your samples seem to support, is that the as-cast surface is more more golden than the 'true' color. Being mostly copper, this alloy will tarnish and it must develop a bit of oxide coating when cooling after casting.

However, I have seen some fantastic pieces online that look perfectly golden after sanding and polishing. One more avenue I want to explore is incorporating silicon to the alloy. I heard this improves the color even more. An easy way to do this would be to use cast aluminum instead of soda can aluminum: casting Al has something like 12% silicon to help prevent shrinkage, so that would contribute a couple percent of Si to the final bronze. Cast aluminum is found in aluminum objects that were cast, as opposed to extruded (like cans). Wheel rims for cars are very popular in the casting community, although good luck breaking them down into usable-size pieces. I have some yard spotlight housings that appear to be cast Al that I need to melt down. I also really want to try 'conditioning' soda can Al by adding powdered Si and seeing if that will dissolve and alloy properly. So much stuff I want to do, but I just can't seem to find the motivation these days. :/

[Edited on 11-4-2019 by MrHomeScientist]

elementcollector1 - 4-11-2019 at 18:32

Nice photography work! Your camera is way better than mine. I'm pleased to see I was able to get very close to your sample #2 with ingot D - and it's also great to have a confirmation about the paleness of the color when polished.

Silicon affects the color? I'm interested to try this. If I remember right, only a very small amount of silicon actually dissolves in aluminum or copper, so it might be worthwhile to simply toss a chunk in during melt and wait for it to saturate the molten mix over time - it should float on the mix and not melt. Maybe even a silicon powder, with stirring, to act as both a flux and a part of the alloy?

elementcollector1 - 7-11-2019 at 14:13

Just got some (presumably) A356 aluminum alloy wheel parts from a local junkyard. Should be about 7% Si, and like you said, they're fairly large pieces (and, in fact, the only actual pieces I could find - the rest were whole wheels). Going to try and section them and then melt into a 90/10 composition tomorrow (or 90/9.3/0.7, I suppose), using the same copper source. I'm pretty curious to see how these will turn out - I'm expecting them to be a fair bit darker than the stuff I've been making.

MrHomeScientist - 8-11-2019 at 16:42

Awesome! I'm eager to see the results.

elementcollector1 - 9-11-2019 at 13:57

And here they are!


The 90/10 A356 ingot is on the bottom, and the two on the top are 95/5 pure Cu/Al ingots. What's interesting is that the color is pretty comparable in this lighting - that Si has clearly made some sort of difference. However, it becomes more apparent in person that while the polished form is roughly the same as that of the 95/5 ingots (i.e. still a touch too pale), the unpolished form is actually visibly a darker yellow. Next trial will be 95/5 Cu/A356, and I might also do one with a manual addition of some pure Si I got from a rock shop to check if removing the other impurities in A356 improves the color further.

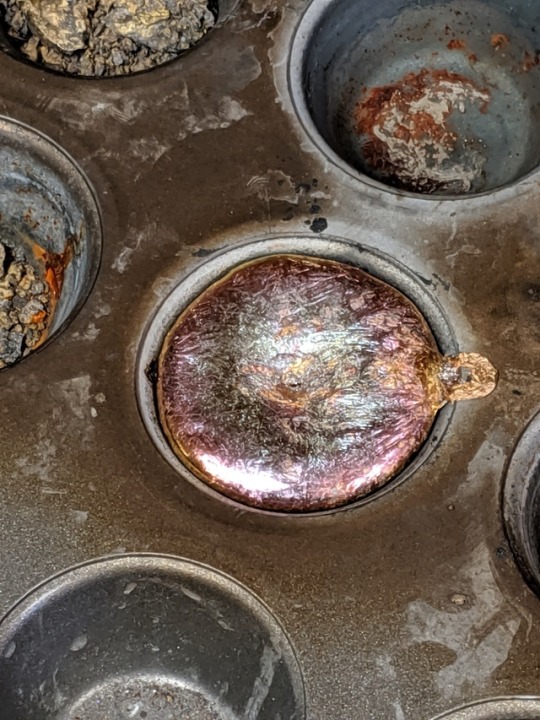
One last interesting thing I found is that when this alloy cooled from molten, it formed a bright purple temper on the surface, which was a little hard to capture on photo:


This removed itself when quenched all the way down to room temperature with water, but it was still fascinating to briefly see a bright purple metal!

MrHomeScientist - 13-11-2019 at 09:20

Very cool! The purple color is really interesting. It sounds like the "true" color you see in the polished metal didn't change much, though. It's curious that it affects the oxide coating more.


Here's a video of a silicon bronze cast: https://www.youtube.com/watch?v=yW4TgZoUsK8&feature=yout...

Wonderful video that covers the entire casting process from start to finish. I definitely recommend watching the whole thing if you're looking at getting into sand casting at all. But skip to 27:50 to see the finished product. The polished edges on his coin look phenomenal! According to the video description, his alloy is "6.5% aluminium 2.5% silicon pinch iron and Manganese balance copper." An interesting deviation from the "standard" 10% Al most people seem to use; it looks like his is around 10% total alloying elements.

Edit: It looks like C64200 is a common commercial Al-Si bronze alloy, with 7% Al and 1.8% Si. I might try and get a sample of it from someone.

[Edited on 11-13-2019 by MrHomeScientist]

Edit Edit: Another option would be to buy silicon bronze and add Al to that. Belmont Metals has "Silicon Bronze Everdur" that is 95% Cu, 4% Si, and 1% Mn. If my math is right, starting with 100g of Everdur you'd need to mix:
100g Everdur
49.6g Cu wire
10.4g Al wire

to get to the video's ratios. This yields:
160g total weight
93.5% Cu
6.5% Al
2.5% Si
0.6% Mn

Belmont, unfortunately, has a rather steep minimum order threshold, but we can use this as an example.

[Edited on 11-13-2019 by MrHomeScientist]

elementcollector1 - 14-3-2020 at 16:02

Switched over to brass for a bit. I was curious to see if I could make an ingot without lighting the zinc on fire, by starting with molten zinc and adding copper. Turns out the answer is a resounding 'sort of'.

Heating to about 500 allowed me to melt all of the zinc (purity 99.2%, from roofing strip) easily. Adding in an excess of copper until everything solidified also proved easy, and the solidified chunk turned vaguely gold-ish (at least, compared to the molten zinc). Turning up to 700 presented little problem, although the zinc did start to smoke and form zinc oxide in the air. More copper was added and the mixture was allowed to sit and dissolve. It didn't solidify this time, but I ended up turning it up to 900 C to get things going. Unfortunately, this was where the zinc started oxidizing in earnest, forming cotton-candy-like puffs of ZnO that stuck to my stir rod and lighting up green whenever I so much as poked the molten mixture. Adding in copper did nothing to alleviate this effect, and eventually I gave up and poured out some ingots.

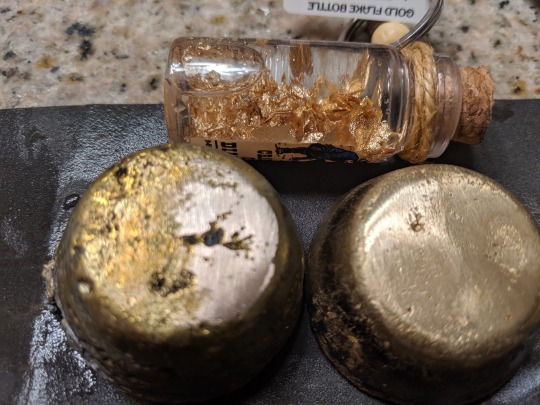
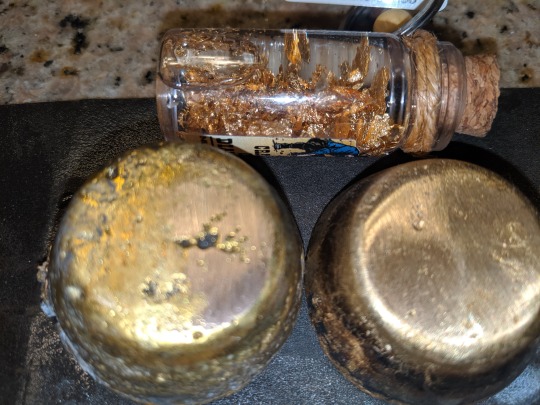
Here's a color comparison between an ingot of brass (left), an ingot of aluminum bronze (right), and pure gold leaf (top):


As you can see, they're both too pale when polished. It's difficult to see in this artificial light (being as yellow-orange as it is), but the brass is actually extremely yellow in as-cast form, far more so than gold itself.

I'm thinking maybe a mixture of the two would allow an as-cast color identical to gold? Polishing would then be alleviated by allowing it to tarnish back to the appropriate shade and then sealing it with something to prevent further oxidation. I've no idea of the composition of this brass at the moment - I'll edit this post as soon as I can measure it.

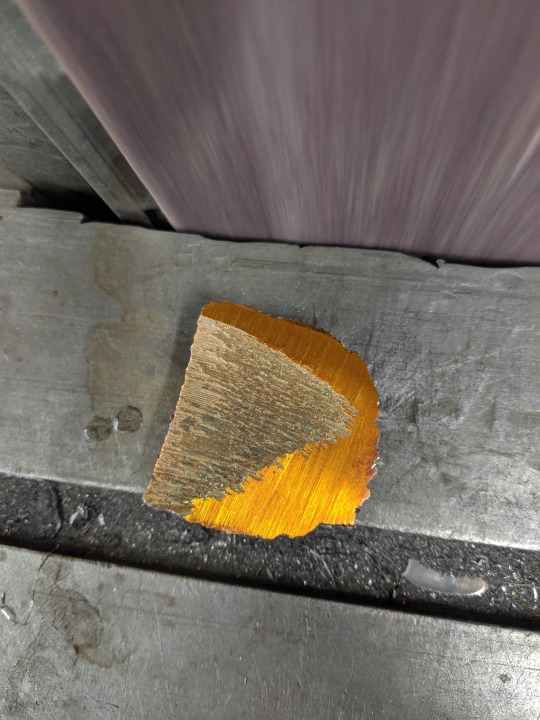
I also noticed another interesting thing when polishing a previous sample of aluminum bronze. Because of the high speeds of the belt sander, the sample began to temper on the polished surface to a very uniform color, and appeared to have the full range of temper colors, just like steel (which makes sense, as tempering colors are a thin-film iridescence effect due to a very thin oxide layer that diffuses into the lattice a certain depth at a certain temperature). Here are bronze, blue-green and violet:


The bronze color is gorgeous, but it's unfortunately too dark for real gold. There does exist a lighter bronze color as the lowest temper coloration, so I'm thinking specimens could possibly tempered to the proper color if needed?

...I just really want to get this color exactly right.