DutchChemistryBox
Hazard to Self
 
Posts: 74
Registered: 24-3-2013
Location: Strasbourg
Member Is Offline
Mood: No Mood
|
|
My homelab, from the beginning till now.
Hello Sciencemadnesses,
Due to the fact I really like to read about other people’s lab and to see pictures of it, I thought by myself:”Why wouldn’t I start a topic
about my lab if there is a chance that people will like it just as I like that of them?”
So with these, how I’ve got started with my lab. I hope you guys will enjoy it. I want to warn you guys for my bad English, I’ll do my best to be
as clear as possible.
I’ve always been interested in science, it fascinated me to discover how things work. So it wasn’t a strange choice of me to go to the school for
laboratory education, right now I am at the beginning of the third grade. Because I wanted to learn more about chemistry I decided to start my own
lab.
I’ve read a lot about it, and one of the greatest potential problems was the reaction of the municipality. Without really thinking about it I had
mailed them with the question what their opinion was about it. Afterwards I didn't know whether it was smart what I had done.
I had discovered the great website of woelen, after some time I discovered that he was from the same country as I am. I mailed woelen for some
advices, he was very helpful so I want to thank him again for that. The municipality wanted to have a conversation with me.
Unlike my expectation they were very excited about it and wanted to encourage such projects on condition that it was conform some basic safety rules
such as having a fire extinguisher, having running water, always wearing a lab coat etcetera. They also want to see the lab when it is done
(presumably to check whether it stays under control or not).
With a positive attitude I started with building (my lab was nothing more than an empty room).
The Lab
I started with the workbench, I wanted to personalize my workbench so I’ve made it by myself with MDF. I made a drawing in google sketchup. The
bench is drowned as 1,5meter wide, 0,7meter deep and 0,85meter high.
I was inspired by the following workbench:

Next I’ve made a drawing in google sketchup

Getting started and determining or it will be a success or not.

The first parts are done, so let’s buy more wood.


Yeahh, it fits nicely together.

Let’s assembly and paint it. It is just “normal” satin gloss acryl paint. One door is already placed.

I was searching for a good benchtop which can withstand the most chemicals. First I thought about coating wood with epoxy, but after seeing that this
isn’t easy at all I choose for an IKEA benchtop.
I’ll use this one till I have money for a good benchtop, I like the trespa top lab ones. Maybe this benchtop won’t get ugly so I can use it for a
few years.
The FAR faucet is from an old school lab.

|
|
|
DutchChemistryBox
Hazard to Self
 
Posts: 74
Registered: 24-3-2013
Location: Strasbourg
Member Is Offline
Mood: No Mood
|
|
Lab journal
Lab journal
One of the most important things on the lab is knowing what you’re doing and knowing what you’ve done. That’s the reason to make a lab journal.
You all know what a lab journal looks like, a hardcover a4 in which I notate: Experiment title, Goal, Method, Observations, Calculations, Discussion
and Conclusion.
To keep a track on all experiment I’ve made a database in Microsoft acces, so I always know which experiment is in which labjournal and on which
page. Which chemicals I need for it, which chemicals I make in that experiment, the yield, H&P safety sentences and so on.
The database also generates a label for every chemical so I don’t have to write it on the bottle anymore.
It seems to be overkill for an home lab, but I’m really convinced that I’ll be happy with it in a few years.


My school started a week ago, so I don’t have that much time to build anymore. But I’ll finish the bench ASAP so I can move on with my lab.
Of coarse I’ll post pictures of the progress, things like storing my chemicals, my completed bench, glassware and such.
|
|
|
bfesser
Resident Wikipedian
    
Posts: 2114
Registered: 29-1-2008
Member Is Offline
Mood: No Mood
|
|
Very nice. I wonder if you've seen this thread:
<strong><a href="viewthread.php?tid=4777">Tour My Lab</a></strong>
|
|
|
Magpie
lab constructor
    
Posts: 5939
Registered: 1-11-2003
Location: USA
Member Is Offline
Mood: Chemistry: the subtle science.
|
|
Quote: Originally posted by DutchChemistryBox  |
... The municipality wanted to have a conversation with me.
Unlike my expectation they were very excited about it and wanted to encourage such projects on condition that it was conform some basic safety rules
such as having a fire extinguisher, having running water, always wearing a lab coat etcetera. They also want to see the lab when it is done
(presumably to check whether it stays under control or not).
With a positive attitude I started with building (my lab was nothing more than an empty room).
|
That's outstanding! You must live in the most enlightened country in the world!
There was a time when US authorities might have responded in a like manner...a time before meth labs and the 9/11 terrorism...a time long ago. 
The single most important condition for a successful synthesis is good mixing - Nicodem
|
|
|
prof_genius
Hazard to Others
  
Posts: 147
Registered: 15-5-2013
Member Is Offline
Mood: No Mood
|
|
Wow you have a very nice lab.
|
|
|
woelen
Super Administrator
        
Posts: 8013
Registered: 20-8-2005
Location: Netherlands
Member Is Offline
Mood: interested
|
|
Nice to see how this project proceeds. Once you are ready for true experimenting and have a safe and working lab, then just contact me again. I'm
quite sure I can make you happy with some interesting stuff from my lab to get you started with inorganic chemistry (e.g. transition metal salts, some
ligands).
|
|
|
Bezaleel
Hazard to Others
  
Posts: 444
Registered: 28-2-2009
Member Is Offline
Mood: transitional
|
|
It's truly great to see somebody start out like this. I can tell you from experience that it is also very rewarding to have a good closet to store
your glassware and chemicals in. From your pictures, I guess you'll make something beautiful for that as well. ::thumbsup::
|
|
|
phlogiston
International Hazard
    
Posts: 1379
Registered: 26-4-2008
Location: Neon Thorium Erbium Lanthanum Neodymium Sulphur
Member Is Offline
Mood: pyrophoric
|
|
Jij houd niet van half werk! ('you don't like doing a half-decent job', a Dutch expression).
Good job! Most people just start out on the garage floor with a few glass jars from the kitchen.
Very nice to see someone doing it properly right from the start.
I never would have considered asking the municipality, but given their very reasonable response it worked out very well. It may prevent any
misunderstandings should your lab be 'discovered' later, perhaps after a burglary or a curious neighbour.
I hope for you, though, that they won't pay you a visit any time there is a funny smell or a loud bang in your neighbourhood.
[Edited on 7-9-2013 by phlogiston]
-----
"If a rocket goes up, who cares where it comes down, that's not my concern said Wernher von Braun" - Tom Lehrer |
|
|
DutchChemistryBox
Hazard to Self
 
Posts: 74
Registered: 24-3-2013
Location: Strasbourg
Member Is Offline
Mood: No Mood
|
|
Thanks for all the positive feedback! That really motivates me!
The next few weeks I'll be busy with finishing the lab. For example that I want to make some drawers and that I still have to paint a lot.
After that I'm going to start with some simple syntheses which I've learned at school, like the synthese of methylsalicylate or glacial acetic acid.
|
|
|
Bezaleel
Hazard to Others
  
Posts: 444
Registered: 28-2-2009
Member Is Offline
Mood: transitional
|
|
DutchChemistryBox, since you mentioned drawers, this is what I made for glassware &c:
 Closet Closet
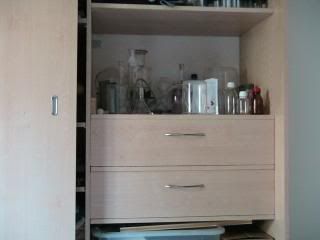 Two tightly closing drawers, to keep things as dust free as possible Two tightly closing drawers, to keep things as dust free as possible
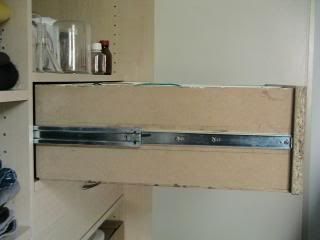 Drawers can be 100% pulled out (max content load = 15kg) Drawers can be 100% pulled out (max content load = 15kg)
 Top drawer with foam holder for flasks & beakers Top drawer with foam holder for flasks & beakers
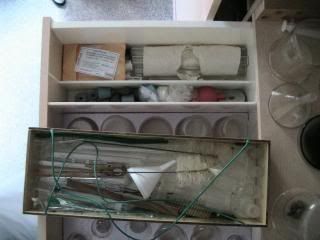 Small tray for adapters, test tubes &c can be taken out, giving access to my rubber stoppers and less frequently used objects Small tray for adapters, test tubes &c can be taken out, giving access to my rubber stoppers and less frequently used objects
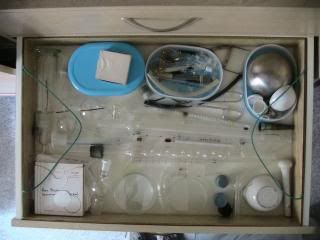 Bottom drawer: tray for petri dishes, coolers, tubes, and the like Bottom drawer: tray for petri dishes, coolers, tubes, and the like
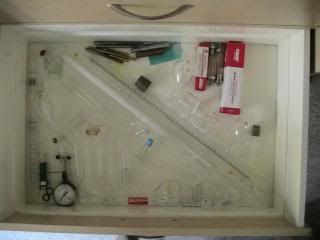 Bottom drawer: lower part for burette, quartz tube, syringes small flasks, other less frequently used glassware Bottom drawer: lower part for burette, quartz tube, syringes small flasks, other less frequently used glassware
The idea of the trays that can be taken out is very space economic. Making tightly closing drawers is a very time consuming job. I coated them on the
inside with polyester with some TiO2 mixed in for the colour.
[Edited on 11-9-2013 by Bezaleel]
|
|
|
BobD1001
Hazard to Others
  
Posts: 182
Registered: 29-3-2013
Member Is Offline
Mood: No Mood
|
|
Bezaleel, did you build that cabinet/drawer combination yourself?! Absolutely great work, and superbly organized!
|
|
|
Bezaleel
Hazard to Others
  
Posts: 444
Registered: 28-2-2009
Member Is Offline
Mood: transitional
|
|
Thanks, yes I did. I was/am in a total cleanup of everything I own, and concluded I desparately needed more storage space. Glassware and simple
apparatus moved into this cabinet, but chems were put in a different space - dark, dry and mostly constant in temperature.
|
|
|
BobD1001
Hazard to Others
  
Posts: 182
Registered: 29-3-2013
Member Is Offline
Mood: No Mood
|
|
Bezaleel, do you happen to have plans you could share for that cabinet? I would love to build the same for my lab, as my current cabinets are quickly
running out of space
|
|
|
Bezaleel
Hazard to Others
  
Posts: 444
Registered: 28-2-2009
Member Is Offline
Mood: transitional
|
|
BobD1001, I looked for them, but I guess they found their way to the recycling bin. Everything was fully custom built for the space available, which
was the only way to use all of the space available between floor and ceiling.
The available width divided in three yielded the width: 76cm. Depth was determined by the width of boards available form the hardware store.
Substracting the space required by the sliding doors and handles for the drawers gave the depth available for the drawers.
A friend of mine had a mold for drilling holes every 32 mm, which allows the shelves to be repositioned as required. The height for the drawers was
such as to be enough for the largest beakers I wanted to put in, and to fill up all space between two shelves at the same time.
I adapted the guides (one of the most difficult parts of the whole operation) so that the drawers could be drawn out completely, which was necessary
to be able to pull out the trays. The guides I bought were somewhat shorter than the depth of the drawers, so I changed them to become extendable to
120% or thereabout. Please think about this very carefully before buying anything. Adapting the guides was a very time consuming and complicated work;
you'd better not.
In retrospect, I made one error, that I advise you to consider carefully before you or anyone else taking on a project like this: make things roomy.
You will find yourself buying more glassware and other equipment over time. E.g. if I would do the same work again, I would have left space in the
upper drawer for more flasks. The other stuff would simply have moved into a third drawer. In the lower drawer I would have dedicated one tray to
destillation equipment only. (The vigreux from the lower tray should be there. It's not because I use it only very rarely.)
You may also consider to build a much higher drawer for your larger glassware. I have some 1 l beakers, and 2 l Erlenmeyers that simply won't fit in.
I got those beakers as a gift, and I'm surprised you often they have proved to be useful. Suction flasks and tripods tend to be large also. These have
now ended up in the "unused" space over the upper drawer, as you can see in the 2nd picture.
Also consider a drawer for storage vials. Mine have found a place above the large glassware, but a drawer for them would be more satisfactory. You may
even consider a drawer for vials with compounds that do not give off any kind of fumes. Those that do give off fumes, even if it's only a bit (like my
lead nitrate), I'd always store away from my glassware.
Hint: everything stored outside of the drawers does collect bits of dust on it over time.
Hint: all shelves underneath or between the drawers have a 1cm recess over the middle 80% of their width along the back side. This is to avoid air
cushioning behind the drawers, and to prevent air being pushed into the other drawers when one is opened or closed. (This is about the distance
between the outside back of the drawers and the rear wall of the cabinet.)
In short: reserve extra space for things to come. The more the better. Think twice before starting to build something. Hope this helps.
|
|
|